Lecture 8: SpriteKit
BrickBreaker Handout Code
Download the handout code for lecture here.
Building a Game with SpriteKit
A SpriteKit game can be broken down into 3 main parts: Scenes, SKNodes, Physics. We will cover each of these parts in detail.
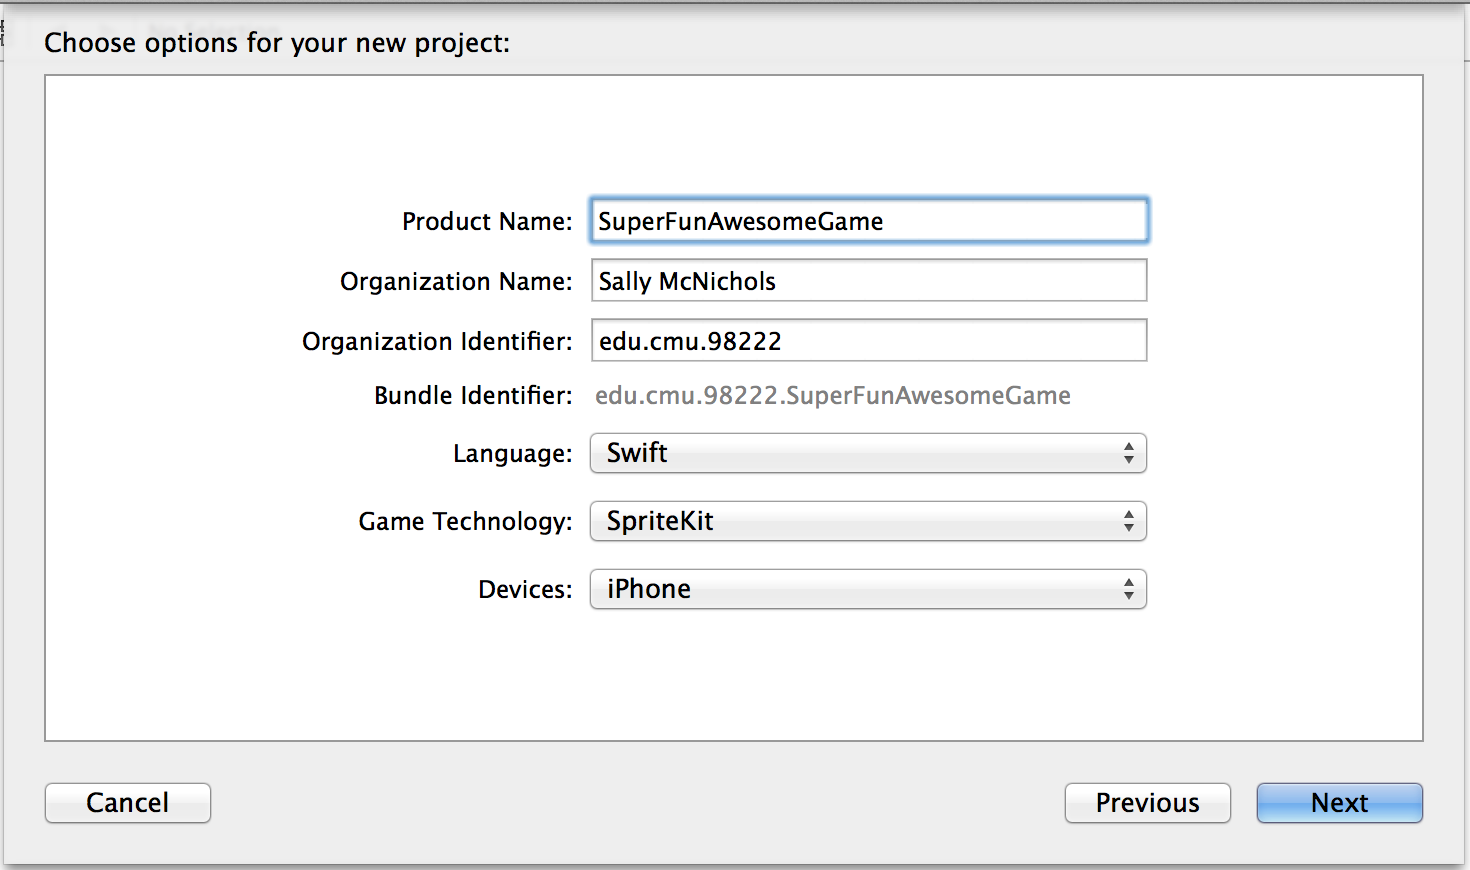
To set up a SpriteKit game in Xcode you can choose the game template:
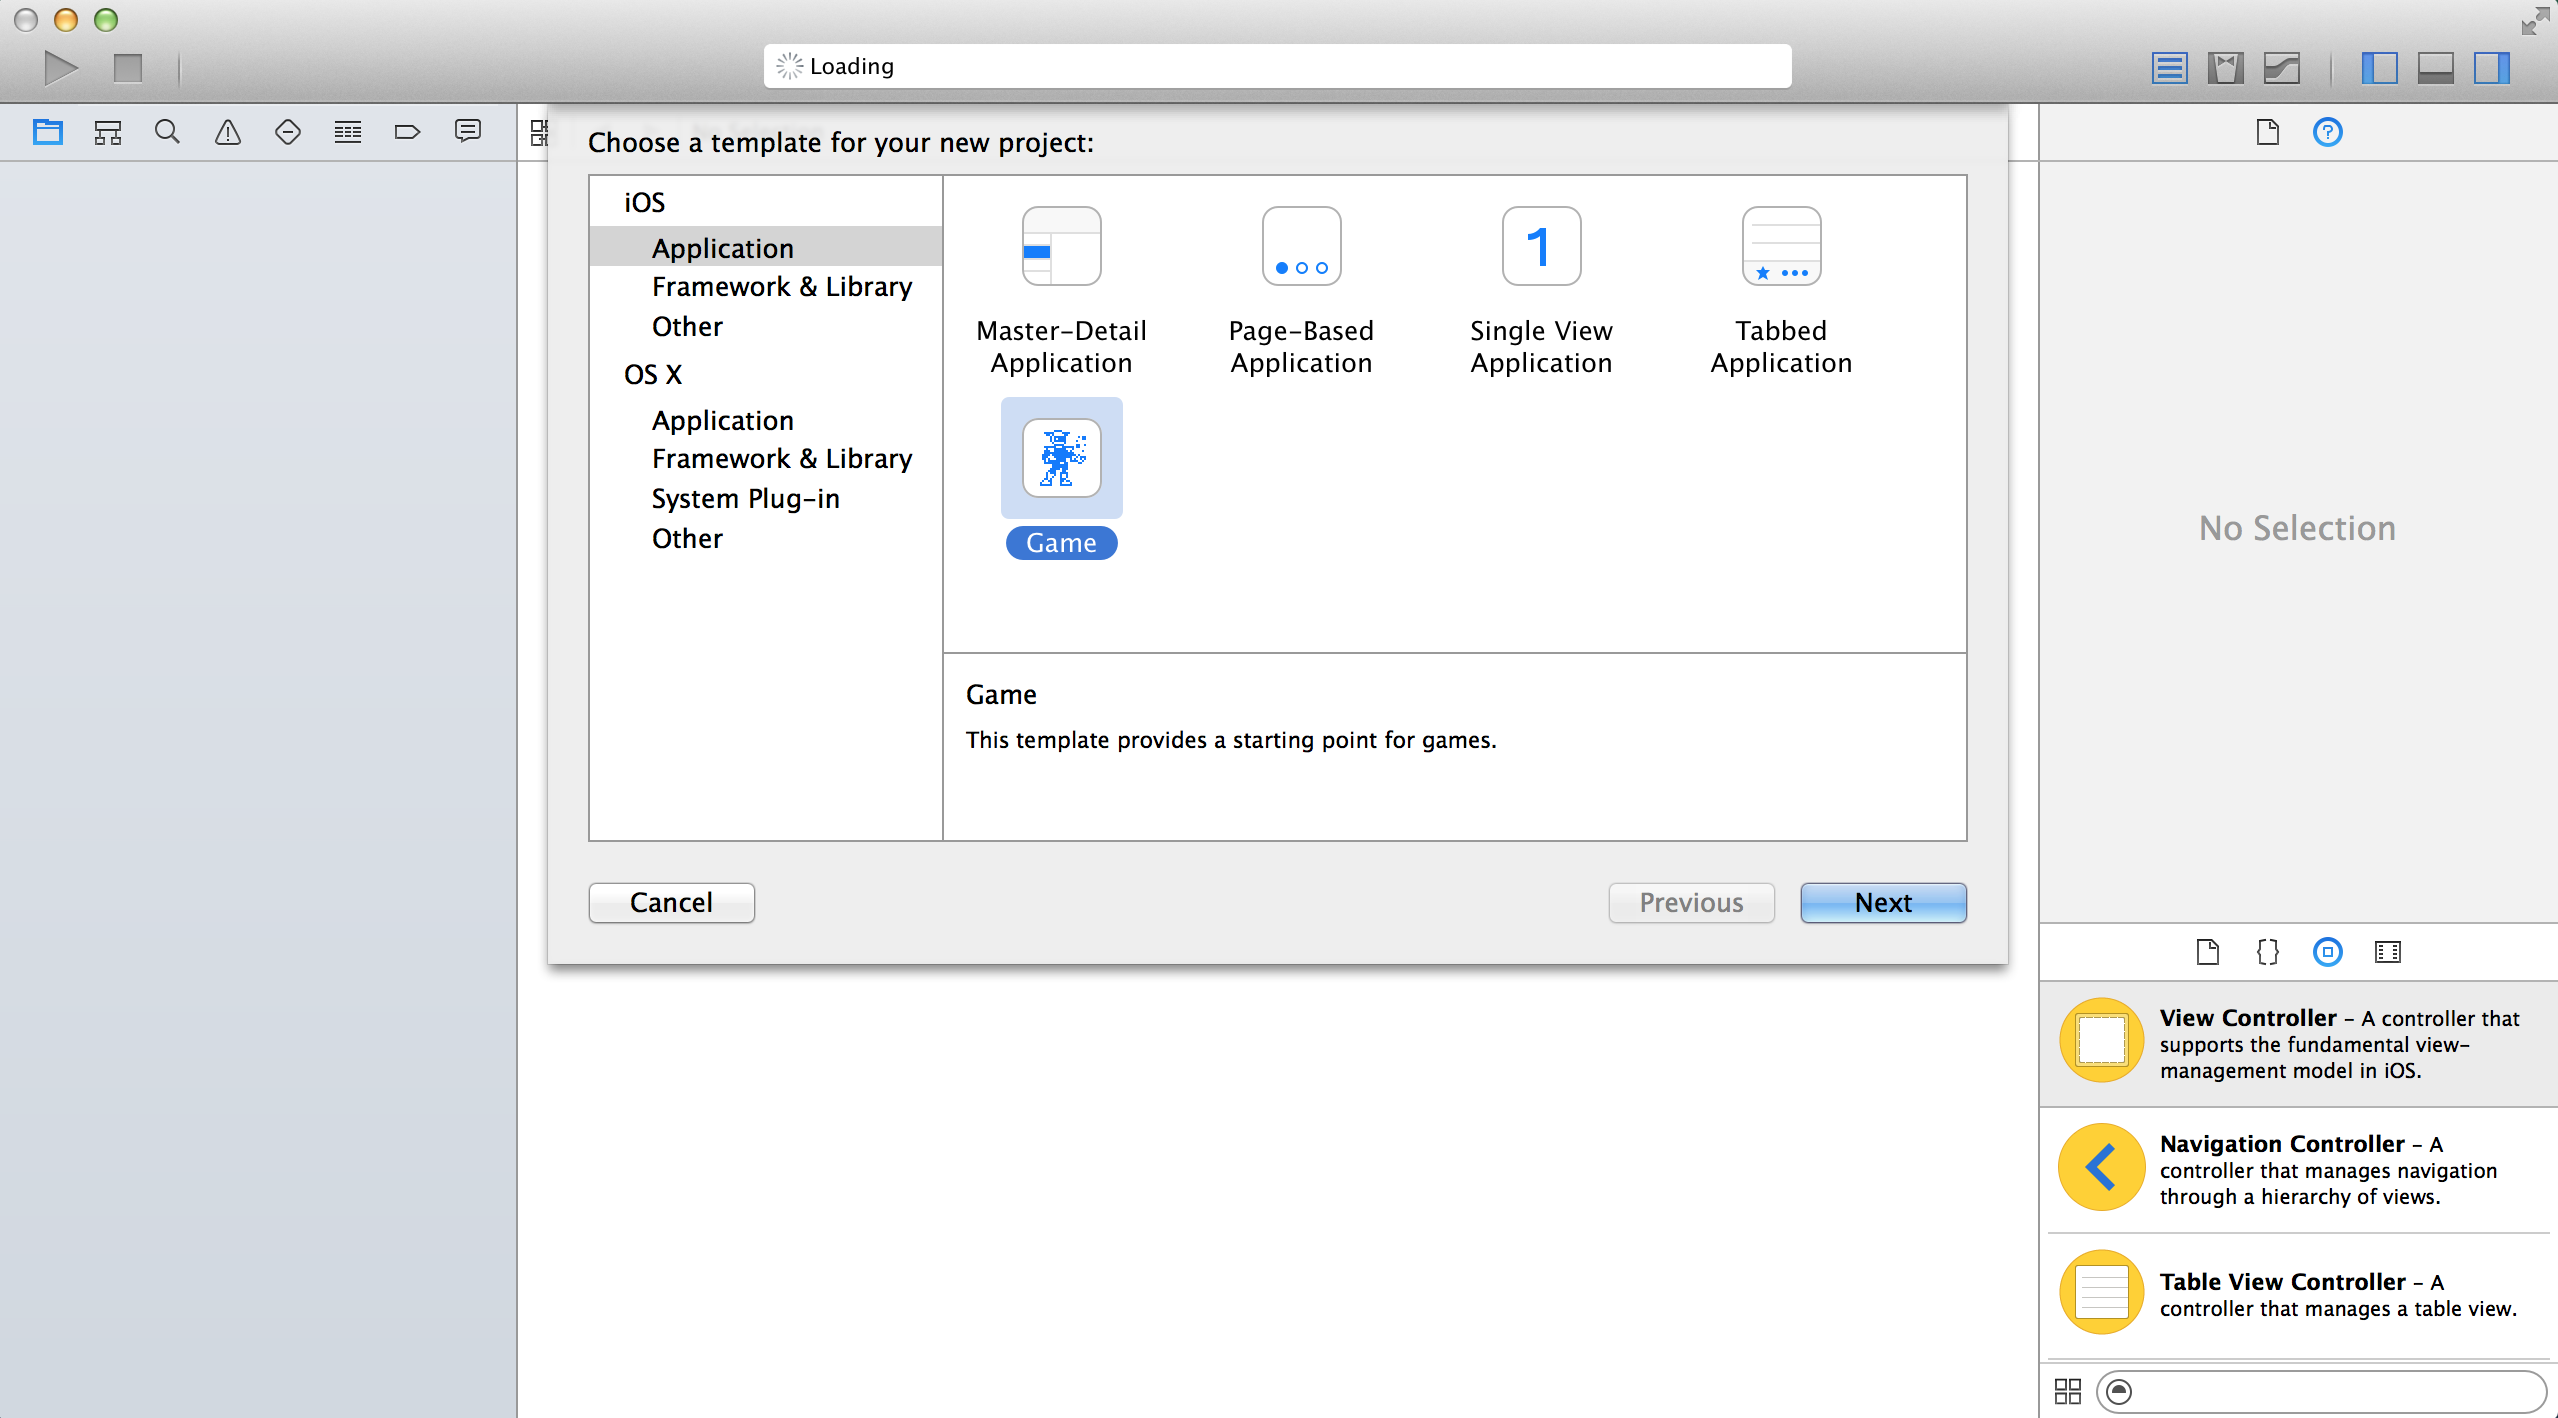
Set the Game Technology to SpriteKit:
Note the files the game application template provides. In terms of the model-view-controller pattern in app development, there is a GameScene class that provides the model. This is where much of the behavior of your game will be determined. Then, the controller is the GameViewController which holds a view that will present the scene the user interacts with.
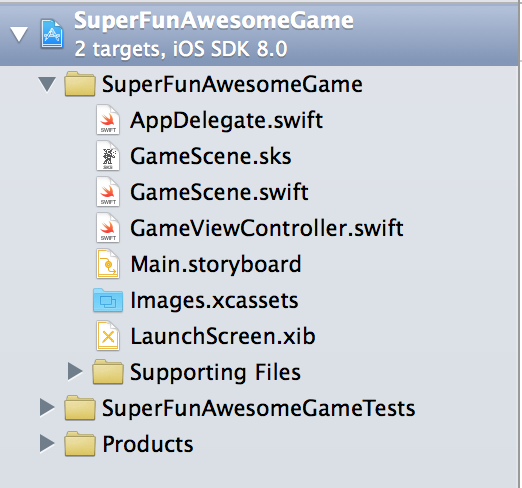
Also note the GameScene.sks file. This is kind of
like the SpriteKit version of storyboard. If you click on the
file and look at the tool bar on the right side of Xcode, you
see different objects that you can add to the
GameScene (just like for storyboard there are things
like UIButton, UILabel, UIImage,
etc. that you can add to a UIViewController).
![]()
We are not going to cover how to use the GameScene builder because just like with storyboard you do not have as much control over the objects compared with setting up the GameScene programmatically (or at least it's harder to keep track of all the objects and their properties). If you are interested in using this GameScene builder tool, it isn't super hard to figure out. It's just mostly annoying to use.
So that is how you create a new game project. Now we will begin to discuss how to actually build the game.
Scenes
The scene is just what it sounds like: the "stage" where the game takes place. Much like you have actors performing on a stage, you can add SKNodes to the SKScene. The SKScene will be the root in the tree of SKNodes (we'll talk a little more about this later). The scene also controls the physics that go on in your game.
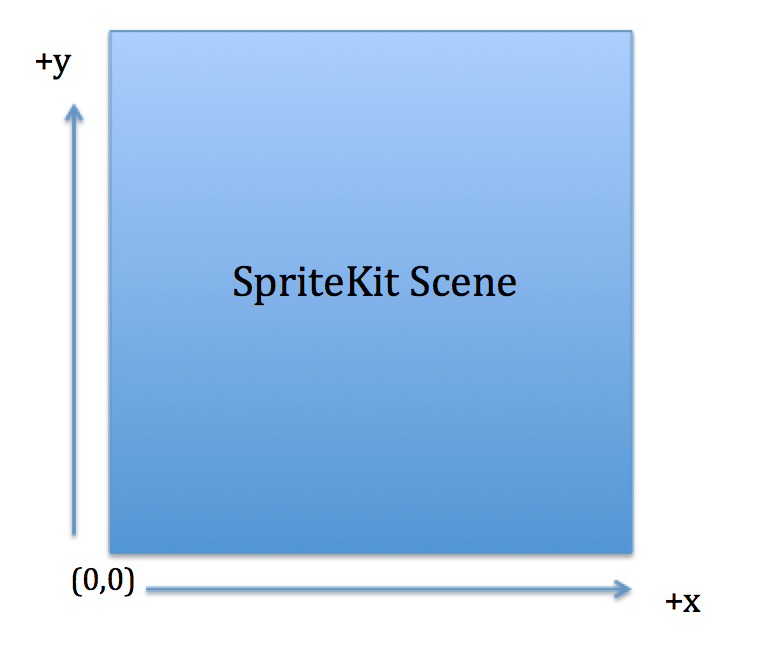
One important thing to note is that SpriteKit uses a different coordinate system than UIViews. Recall that UIViews have the origin in the upper left corner. SpriteKit, on the other hand, has the origin in the bottom left corner (this is probably because SpriteKit's renderer is OpenGL-based, which uses that coordinate system).
The framework for setting up a scene is something like this:
class GameScene: SKScene, SKPhysicsContactDelegate{
...

    override init(size: CGSize) {
        // initialize class variables
        ...

        // call to superclass init
        super.init(size: size)

        // setup basic scene properties
        self.backgroundColor = SKColor.blackColor()
        // acceleration due to gravity that you want in your game
        self.physicsWorld.gravity = CGVectorMake(0, -9.8)
        // set contact delegate so that this class will be notified of SKNode contacts
        self.physicsWorld.contactDelegate = self

        // any other initialization
        ...
    }

    // what happens whenever the scene is presented by a view
    override func didMoveToView(view: SKView) {
        // do any necessary setup for when the game starts
        ...
    }

    // what happens before each frame is loaded
    override func update(currentTime: CFTimeInterval) {
      // check state of game and make any necessary updates
      ...
    }

    ...
}
A few notes about setting up the GameScene. First, the didMoveToView function: this function is called immediately after a view presents the game scene object using the function:
func presentScene(_ scene: SKScene?)
If you need to do any setup for the game (you probably will because the game will probably have some sort of starting state), this is the place to do it.
The update function is automatically called before each frame of the game is
In the init function, notice how you set properties of the physicsWorld. Setting up properties of the physics world will set the behavior of physics for the physics bodies (so basically the sprites in the scene that you want physics to affect) added to this scene.
Lastly, notice the contactDelegate. Remember those things called protocols and delgates? (See lecture 2 if you need to refresh your memory). Aha, well here is another time we are using them (they are used a lot in iOS development, so make sure you understand how protocols and the delegation pattern work if you haven't already). If you look at the GameScene class declaration you can see that it subscribes to the SKPhysicsContactDelegate protocol. Therefore, there must be some functions that it needs to implement. The function that we are particularly interested in is:
func didBeginContact(_ contact: SKPhysicsContact)
Since we are setting the contactDelegate of the scene's physicsWorld, the physicsWorld object will call didBeginContact on the GameScene whenever it detects that two of the physicsBodies in its world have overlapped. This is definitely one reason why SpriteKit is pretty awesome: it makes handling collisions/contacts very easy. We will cover more specifics about collisions and contacts in a bit, but for now this is how the scene is set up for detecting and handling collisions/contacts.
After initializing and setting up the scene, the rest of the game is mostly just adding SKNodes (so sprites, labels, etc.) and handling collisions and contacts. SKNodes and Physics will be discussed more in detail in subsequent sections. If you want to add a SKNode to the game scene, then you use the function
func addChild(_ node: SKNode)
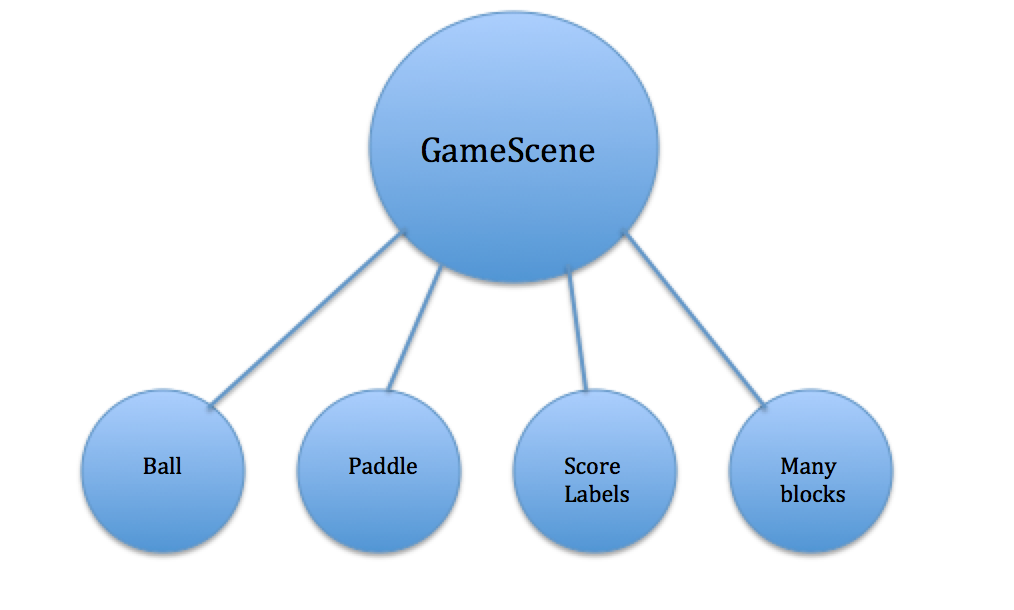
Note that this is a function of the SKNode class. That is because SKScene is a subclass of the SKNode class. So really a SpriteKit game comprises of many SKNodes. However, the SKScene node is special because it acts as the root of all the node in the game. When you add other SKNodes to the scene, you add them as children of the scene. What this is doing is saying that you would like all the nodes directly under the scene to be in the coordinate system of the scene and move with respect to that coordinate system. That also means you can add nodes as children to any of the SKNodes in your game. This is handy and makes calculations easier if you want certain nodes to move with respect to another node instead of the overall scene. So, for example, this is what the tree of nodes looks like for the BrickBreaker app made in lecture:
Check out the iOS Developer Library for more specific fields and functions for SKScene and SKPhysicsWorld.
SKNodes
So once you have a scene set up, you need to add your actors: SKNodes. These "actors" are not only limited to sprites. SKNodes encompass anything you want to be part of the game: sprites, labels, physics fields, etc. As mentioned earlier, even the SKScene is a SKNode. Really, most of the things in a game are SKNodes.
General
An important property of a SKNodes is position. While this field is probably very straight forward, it is important to know since knowing where nodes are in the scene is a large part of making a game. The position property indicates where the center of the node is with respect to its parent (probably most likely the scene).
SKSpriteNode
This is a node that draw a textured sprite. Examples of when you might want to use this type of node are if you have some sort of image that you want to represent something in your game such as a character in your game. You can initialize a SKSpriteNode with an image by creating a SKTexture with an image. Then, if you want you can blend a color with this texture. In the BrickBreaker game this was how we achieved the different color blocks. We initialized many blocks with picture of a small gray block and then blended each block with a specified color by setting the color property of the sprite. Something like photoshop is helpful for creating images for SKSpriteNodes. Also, often times when using sprites you may have multiple images for one sprite. For example, you may want to animate a sprite so that it looks like it actually is moving instead of just having one static image to represent a sprite. You can acheive this animation by using a SKAction (these are like animations for SpriteKit). For animating sprites, the SKAction that you probably want to use is SKAction.animateWithTextures. Look here for more information on using SKActions for animating SKSpriteNode. We will also cover SKActions a bit more in detail later on.
SKLabelNode
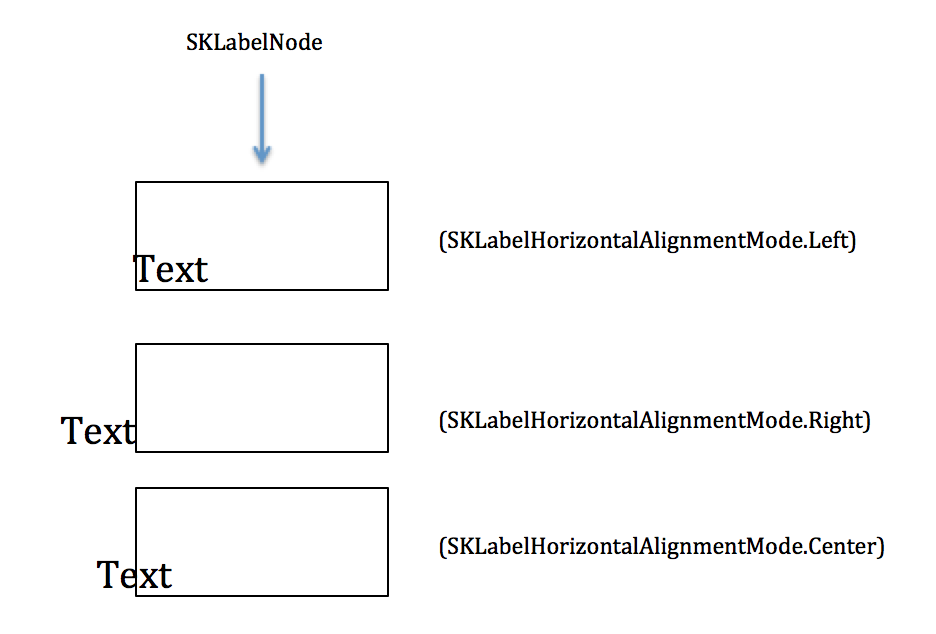
This is a node that draws a string. While it doesn't sound very exciting, labels are important in games. Also, it might be hard to draw a string with graphics otherwise, so having a special type of SKNode that does this for you is nice. The properties you can specify with this type of node are the typical properties that you can change with text: font, size, color, etc. You can also specify the alignment of the text. There are two properties related to this: horizontalAlignmentMode and verticalAlignmentMode. Both of these can be set using their corresponding enums with the options of Center, Left, and Right for horizontal and Baseline, Center, Top, and Bottom for vertical. All of these positions indicate where the text is relative to the node's origin. It's important to note this because otherwise things may be slightly confusing. For example, if you use SKLabelHorizontalAlignmentMode.Left the text will actually appear to be right aligned since left horizontal alignment means that the left side of the text (so starting with the first letter of the text) will begin at the origin of the node. This is just something to be aware of to avoid confusion and frustration. Basically, the position specified refers to which part of the text will be on the node's origin.
SKFieldNode
This is a node that applies some type of physics effects (electric field, magnetic field, radial gravity field, spring field, etc.) to a portion of the scene. SKFieldNodes are new to iOS 8 and they are really cool. Basically you can create a SKFieldNode and then any time another node comes into contact with the field node, some sort of physics effect is applied to the node. Basically SpriteKit does a lot of physics calculations for you which is pretty nice. For example, remember the game Doodle jump? The spring field SKFieldNode probably would make implementing a version of the game a lot easier because the effects of jumping on a spring are all handled by SpriteKit physics. If you haven't already caught on, SpriteKit makes game development not that scary because it does a lot of the work for you. Properties of SKFieldNodes that you can customize are things like the type of field, the strength of the field, the region of the field, etc. SKFieldNodes are definitely worth checking out, especially if you want to make a game cool game but anything beyond basic physics scares you. More information about SKFieldNodes here
Other SKNodes
There are quite a few other SKNodes such as SKLightNode, SKEffectNode, SKCropNode, SKEmitterNode, SKVideoNode, and SKShapeNode. There you can use each of these for even more special effects in your game. We've just covered the basics just to give an idea of all the things you can do with SpriteKit. With that, take a look at the type of things you can do with the other types of SKNodes here.
SKActions
SKActions are the SpriteKit version of animations. They allow for smooth movement of SKNodes in a game or just other actions you want to use in a game. You can use them to make a SKNode translate, rotate, scale, move along a specified path, etc. All of the functions in the SKAction class are class functions, so you don't call them on a specific objects to make them happen. Instead, when using SKActions you create a SKAction object and then set it up by specifying all the things that you want to happen when it is run. Once it is set up, you call the function runAction on a SKNode and pass in the action you set up.
func runAction(_ action: SKAction!)
You can call this function on a specific node in the game to make it do something. In fact, you can make many actions happen at once as well (look at the function group in documentation). Now that you have an idea of how to use SKActions, check out all the specific things you can do here.
Physics
PhysicsBody
Every SKNode has a field called physicsBody. If you want a SKNode in your game to be affected by physics (gravity, contacts, collisions, etc.), then you need to create a physicsBody for the SKNode and then customize it according to the physical behavior you would like the it to have. The physicsBody is much like a hitbox for SKNodes in SpriteKit. When you create the physicsBody for a SKNode, you specify its size to indicate what part of the SKNode is affected by phyics (more often than not this will probably just be the whole node). A new feature of iOS 8 is the ability to initialize a SKPhysicsBody with a texture. This is pretty cool because that means the outline of the physicsBody is basically the same shape as the sprite you are working with, so contacts and collisions with a sprite will be much more precise. In many games a sprite's physicsBody/hitbox is just a rectangle, so having the ability to shape the physicsBody to the same boundaries as the image of a sprite is pretty cool. After initializing the physicsBody, you can customize many properties to set up how the node of the physicsBody will appear to be affected by physics. There are many, but some key ones are affectedByGravity, dynamic, mass, velocity, and collision and contact bit masks. After setting up these properties, the node of the physicsBody will appear to be affected by physics as specified. Again, it's really nice that a lot of physics behavior is handled by SpriteKit.
In order to make a physicsBody start moving, you need to apply an impluse to it (if you are not all that familiar with physics, impulse is a product of force and the amount of time the force acts). Applying an impulse will change the linear velocity of the physicsBody. For example, in the BrickBreaker demo app, we applied an impulse to the ball when the game started to initiate the movement of the ball.
Check out all of the different properties and functions related to SKPhysicsBody here.
Contacts and Collisions
Contact and collision detection is an important part of SpriteKit physics. Most games require some sort of contact or collision detection because a lot of game behavior is determined from it. For example in a game like Mario, you want to know if Mario hit a block when he jumped. Luckily SpriteKit makes collision and contact detection pretty easy. Since every SKNodes has a physicsBody, you can specify to the physicsBody what things are allowed to collide with it and when you would like to receive notification that contact occurred with the physicsBody (remember the SKPhysicsContactDelegate from earlier?). You do this by setting 4 UInt32 bit masks: categoryBitMask, collisionBitMask, contactTestBitMask, and fieldBitMask. The way that contacts and collisions work in SpriteKit is that if two physicsBodies overlap with each other, then bit masks are logical ANDed together to determine if the bodies should collide and behave according to physics.
The categoryBitMask is like an identifier for a physicsBody. It is a UInt32 that should be a unique value for the physicsBody it represents.
The collisionBitMask represents all of the physicsBodys that can collide with a physicsBody. To get this value, you can logical OR all of the categoryBitMasks of the physicsBodys that a certain physicsBody can collide with. When a collision is detected by SpriteKit, this bit mask is compared to the categoryBitMask of the body that it collided with by logical AND. If this operation does not result in zero, then the body is affected by the collision. Both of the bodies in the collision independently determine if it is affected by the other body. Note that the default value of this property is all bits set (so the physicsBody will be affected by everything). Therefore, if you do not want collisions to affect a physicsBody, make sure to set this value to 0.
The contactTestBitMask represents all of the physicsBodys you would like to be notified about if they come into contact with a certain physicsBody. To get this value, you can logical OR all of the categoryBitMasks of the physicsBodys that you want to know about. This is where the SKPhysicsContactDelegate comes in. When two bodies overlap, the categoryBitMask of one is ANDed with the contactTestBitMask of the other, and vice versa. If either of those two comparisions are not zero, then the function didBeginContact is called on the SKPhysicsContactDelegate with a SKPhysicsContact object passed in that contains information about which bodies can into contact with each other. Note that since the function is called when either of the comparisions are nonzero, that means you really only need to set the contactTestBitMask of one of the objects involved in the contact you want to be notified about. So, you can implement the function didBeginContact, check which bodies came into contact with each other, and handle the contact accordingly. For example, we did this in the BrickBreaker demo app for handling contact between the ball and blocks and the ball and paddle.
The fieldBitMask represents all of the physics fields that can affect a physics body. It is similar to the collisionBitMask. To get this value, logical OR all of the categoryBitMasks of the physics fields that can affect a physicsBody.
Presenting the Scene in a View
Once you have set up all of your game in the GameScene class, all you need to do is present it in the GameViewController class. This is done by casting the view of the view controller to a SKView and calling the function presentScene.
class GameViewController: UIViewController {

    override func viewDidLoad() {
        super.viewDidLoad()

        var skView = self.view as SKView

        // if the scene hasn't been set already
        if(skView.scene == nil) {
            // hide the frame rate and node count
            skView.showsFPS = false
            skView.showsNodeCount = false
            // ignore rendering order of nodes
            skView.ignoresSiblingOrder = true

            // make new instance of GameScene
            var scene = GameScene(size: self.view.bounds.size)

            // scale the scene to fit the current view. Aspect fill scales X and Y with
            // the same value by checking how much both axis need to be scaled to fit the view
            // and then applies the larger number to both axis
            scene.scaleMode = .AspectFill

            skView.presentScene(scene)
        }
    }
    ...
}
After this step, your game is read to run!
Download Completed BrickBreaker App
You can download the completed BrickBreaker app we made in lecture here.