Lecture 3 - User Interfaces and Protocols and Delegates
In Class
Download the handout code here.Protocols and Delegates
If you've ever programmed in Java or C++, protocols are similar to interfaces or abstract classes. If you don't have experience with Java or C++ and that makes no sense to you, don't worry about it though. Protocols and delegates are pretty easy to learn and prove to be quite useful in iOS development.
Protocols and Delegates Playground
The protocols and delegates Playgrounds that we worked on in class are fully annotated and can be found here, including a partially realized example of the amazing Morbulator.
Protocols
We'll start out by covering the basics of protocols. First, you're probably wondering what a protocol is. Well, it's kind of just what it sounds like: some set of rules or plan for carrying out something.
In the context of iOS development, a protocol is a set of "rules" to which a class subscribes. So, by subscribing to a protocol a class promises to do whatever is defined by the protocol. This usually means that the class promises to implement all of the functions and variables defined in the protocol. Let's see an example to try and make more sense of all of this.
Pretend you have a farm with a bunch of animals. All of the animals need to eat, right? That's a rule, so "eat" would be in the FarmAnimal protocol. And each animal has a name, so "name" would be in the FarmAnimal protocol too.
Different animals have different ways of handling these rules. Let's say there's a cow named Otis. It's time for Otis to eat, so since he's a cow he eats some grass. Now let's say there's a horse named Pegasus. It's time for Pegasus to eat, so since he's a horse he eats hay. See how it depends on the type of animal for how the rule "eat" is carried out?
Let's see what this set of rules might look like in code:
protocol FarmAnimal {
  var name: String { get set }  // name of the animal
  var food: String { get }      // food that the animal eats
  func eat()
}
First, to declare a protocol (the set of "rules") you use the keyword protocol and then whatever you want to name the protocol.
Variables that you want to force as rules are declared the same exact way that they are in classes. The only difference above is the part that says get and set. This is basically to say that this variable should be gettable (that is, other classes should be able to read this member variable) and settable (other classes should be able to set this member variable).
Functions are declared as stubs--identical to the way they're written in classes, just without the function body.
So, classes that subscribe to FarmAnimal absolutely must have a member variable, name, which is both gettable and settable. They will also have another member variable, food, which must be at least gettable. They must also have a function, eat, which takes in nothing and returns nothing. These are rules that classes must, must, MUST obey when they subscribe to this protocol. Otherwise, Xcode complains and won't compile the code.
Another thing to note is that when you define a protocol, the protocol becomes a type. This type cannot be instantiated (it's like an abstract class: the protocol doesn't have any implementations...), but objects that implement the protocol can be cast to the type, which is very helpful as we will see later.
So, let's show an example of a class that subscribes to this protocol:
class Cow: NSObject, FarmAnimal {

    var name: String
    var food: String = "grass"

    init(name: String) {
        self.name = name
    }

    func eat() {
        println("Yum I just ate some \(self.food) because I'm a cow.")
        nap()
    }

    func nap() {
        println("Now I'm going to take a nap because I'm a cow.")
    }
}
Now we create the Cow class which implments the FarmAnimal protocol. See how the function and variables that are delcared in the protocol are all implemented in this class? If that wasn't the case, Xcode would complain at compile-time that the Cow class does not properly implement FarmAnimal.
Now, we can have a totally different class subscribe to this protocol:
class Horse: NSObject, FarmAnimal {

    var name: String
    var food: String = "hay"

    init(name: String) {
        self.name = name
    }

    func eat() {
        println("Wahoo I just ate some \(self.food) because I'm a horse.")
        trotAround()
    }

    func trotAround() {
        println("Now I'm going to trot around because I'm a horse.")
    }
}
The Horse class successfully subscribes to FarmAnimal. It fits all the rules that are set by that protocol, but does it in a different way to the Cow class.
However, the Cow and Horse class have something in common: they both subscribe to FarmAnimal. Therefore, we should be able to, in some respects, treat both of these classes as objects of the same type. We can do that by casting both of these classes to FarmAnimal, like so:
var cow : FarmAnimal = Cow(name: "Otis")
var horse : FarmAnimal = Horse(name: "Pegasus")
var farmAnimals: [FarmAnimal] = [cow, horse]

for animal in farmAnimals
{
  animal.eat()
}
So now observe that instances of classes which implement FarmAnimal can be of type FarmAnimal. This can be very helpful at times. Say you want to feed all your farm animals at once. You can call all the farm animals a FarmAnimal, put them in an array, and then just iterate over all the animals and call eat. This is much easier and cleaner than feeding each animal individually.
In summary, protocols are a set of functions and variables which act as rules. When a class implements a protocol, it is promising that it will implement all of the rules in the protocol.
Delegates
Now that we have covered protocols, we will talk about delegates. To start, we'll discuss the idea of delegation. Delegation is a design pattern. If you aren't sure what that means, no worries. Basically, they are structures or outlines for organizing code to solve common problems. In this case, delegation is when an object hands off some of its work to another object. That means you will have a class that contains a delegate object, usually. To get a better idea of what this means, let's apply delegation to the farm animal example.
So, for example, the Cow class had a "rule" that they had to eat. Cow decided exactly how it would eat. But realistically we know that Cows are kind of helpless and it is actually your duty as the farmer to feed your Cows. Therefore, you will help do some work for the cows by providing them with food so they can eat. You are the Cow's delegate.
So, first we will create a protocol to set the rules for what our delegate will do:
protocol CowDelegate {
    func feedCow(cow: Cow)
}
So, classes that implement this protocol will be responsible for feeding a Cow. So now, we will create a CowFarmer class that subscribes to this protocol and actually feeds the cows.
class CowFarmer: NSObject, CowDelegate {
    func feedCow(cow: Cow) {
        println("Feeding \(cow.name) some \(cow.food)...")
    }
}
So now Cow should have a member dedicated to its delegate, so that Cow can call upon it when it's time to eat:
class Cow: NSObject, FarmAnimal {

  var name: String
  var food: String = "grass"
  var delegate: CowDelegate?

  init(name: String, delegate: CowDelegate) {
    self.name = name
    self.delegate = delegate
  }

  init(name: String) {  // this is a designated initializer. Why?
    self.name = name
  }

  func eat() {
    self.delegate?.feedCow(self)
    nap()
  }

  func nap() {
    println("Now I'm going to take a nap because I'm a cow.")
  }
}
In Line 12, we see some weird syntax: self.delegate?.feedCow(self). This is convenient shorthand for saying: if self.delegate is not nil, call feedCow(self); otherwise, do nothing.
So, we could see this in action:
var cowFarmer = CowFarmer()
var cow = Cow(name: "Joe", delegate: cowFarmer)
cow.eat()
We should see "Feeding Joe some grass...", followed by "Now I'm going to take a nap because I'm a cow". Now, because CowDelegate is a protocol, any class can subscribe to it. Even a BadCowFarmer class like this:
class BadCowFarmer: NSObject, CowDelegate {
    func feedCow(cow: Cow) {
        println("Feeding \(cow.name) some moldy cheese...")
    }
}
There is so much wrong with that. But seriously take some time and let this design pattern sink in.
In summary, a delegate is an object that does work for a certain class. In Swift, it implemented with protocols in order to force the desired behavior. This example with farm animals is pretty simple, but protocols and delegates can be quite helpful when designing an app. You will see this in your homework assignment when you implement an add reminder feature to TinyReminders.
Intro to User Interfaces
The user interface is the point of contact between the app and the user. In my opinion, it's the most important part of your app, simply because a good or bad UI will make or break your app. But, this isn't a design class, so we won't focus right now on what makes a good or bad UI: what we're going to talk about is how to build interfaces using Xcode.
In iOS development, there are three main ways to build user interfaces: code, nibs, and storyboards. There's a decently large debate in the iOS community about which method is the best way to build user interfaces. All three methods have their advantages and disadvantages, so we'll cover all three methods in order for you as the developer to decide what works best for you.
Storyboards
Storyboards are Apple's preferred way of building interfaces. They're the way that you built the PhraseThrow app, as a matter of fact! They provide the simplest, fastest, least-messy, drag-and-drop functionality for build interfaces. Storyboards are especially great for apps with multiple views (which are, pretty much, every app ever, and also of which we have made zero, so far), since they allow you to manage the transitions between those views, called segues. Everything is managed in one file. An example of a full storyboard might look like this:
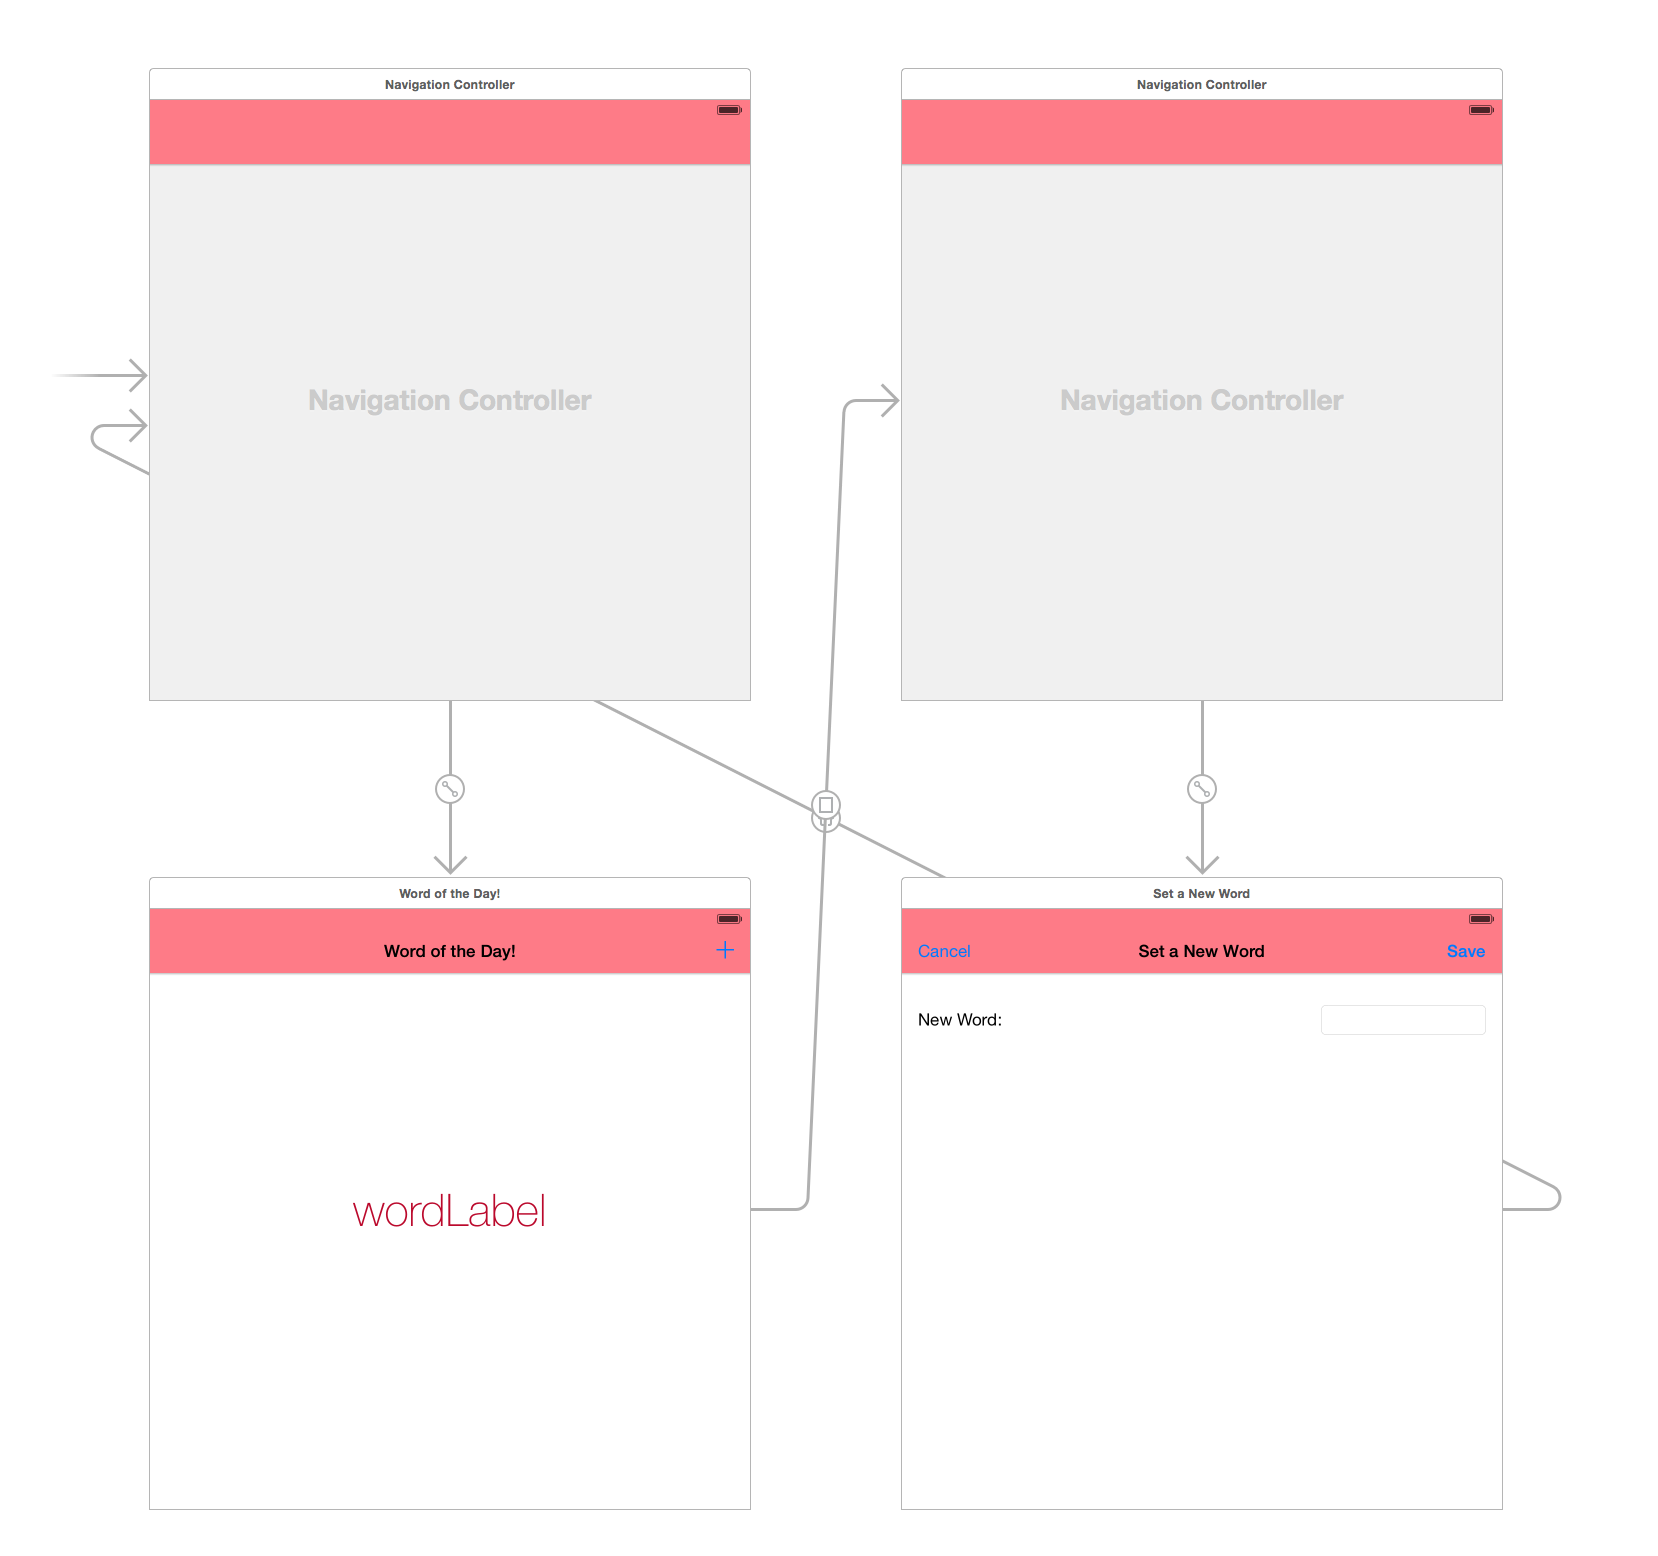
Notice the multiple screens, and the transitions from screen to screen. Storyboards map out the whole entire app for you.
However, Storyboards don't allow much in terms of customization. Making very customized user interfaces (such as in an app like Snapchat) tends to be very difficult and ends up leading into coding your user interfaces, and wasted time. Also storyboards tend to be bad with reusability and data flow.
Storyboards are the newest way of making interfaces, and is the default way to make interfaces in Xcode 6.
Nibs
Nibs, or their more modern counterpart xibs, are basically storyboards without the transitions. Basically, each view controller you work with can come with its own specific screen that you can drag-and-drop labels and buttons and whatnot on. Then, you manage the transitions from screen-to-screen through code.
This is mostly a middle-of-the-road approach to user interface building, since it's part drag-and-drop-abstraction and part code (rather than Storyboards which involve almost no code, and is all abstraction). This, of course, allows for a little bit more customizability, especially with the transitions between two screens. Nibs also solve the reusability problem that storyboards have.
The biggest advantage of nibs is the ability to make custom views for more than just full-sized screens. For example, table cells, which we'll discuss today. These nibs can very easily be integrated with your app. In fact, the app we build today will be a mix of nibs and storyboards, combining the two easiest ways of building an app interface.
The downsides of nibs are similar to those of storyboards: you don't have total customizability yet. But it's a step above storyboards.
Code
No abstraction. All code. You have access to every single piece of every single view, and you have total control over every transition. Total customizability exists in this realm.
However, as you can imagine, there are major cons to coding your user interfaces: it's time-consuming, refactoring is hard, and you won't know what your interface actually looks like until your build and run your app.
This is my preferred way of building user interfaces, mostly because you have the under-the-hood advantage: nothing is hidden from you (has anyone had those "coding-compliant" issues using Storyboards before? Yeah, those don't exist when you code everything).
Short Intro to the Interface Builder
Today, however, we will focus on the first two methods of building user interfaces: nibs and storyboards. To use these two, we must use a very powerful built-in tool with Xcode that you've already gotten fairly comfortable with: Interface Builder.
 Interface Builder is
a built-in tool for Xcode that allows you to make all of the views
for your iOS devices. It is descended from a piece of NeXTSTEP
software of the same name, and was released for iOS development in
2008. It's commonly regarded as the simplest way to make interfaces
your iOS devices.
Interface Builder is
a built-in tool for Xcode that allows you to make all of the views
for your iOS devices. It is descended from a piece of NeXTSTEP
software of the same name, and was released for iOS development in
2008. It's commonly regarded as the simplest way to make interfaces
your iOS devices.
You worked with Interface Builder in the PhraseThrow app, when you drag- and-drop'd everything to your iPhone screen. That was all Interface Builder. You were using Interface Builder to put views such as buttons and labels on a blank iPhone screen, which you now know is known as a nib, or alternatively, xib.
By the way, nib is short for NeXT Interface Builder. Xibs and nibs are used interchangeably--a xib is a nib, but saved to file in a different format (specifically XML), which makes things easier on things like Git, for example. Nowadays Xcode uses xib exclusively, but most people will still refer to it as a nib.
So, a single iPhone (or iPad) blank canvas is known as a nib. Recall that a storyboard, is basically a bunch of nibs, and their transitions (known as segues), shmushed together into one giant graph-like structure. It is an abstraction of your iPhone app that allows you to visualize how your app "flows".
TinyReminders
Today, we'll be building a very, very simple app called TinyReminders. Simply said, it's an app that keeps track of different reminders and dates in a table. You can view individual reminders, and you can add new reminders. This will be our very first multi-view app. Today, however, we will only implement the table of reminders, and viewing individual reminders.
Designing the App
Let's talk about the design a little bit. There are basically two views we want in our app. One is the main view that displays all the reminders in a list. The other is the single reminder view, which allows you to view the details of a single reminder.
In general, it's a good idea to map everything out with pen and paper first, so that you have a general idea of how you want your app to like. Today, we'll map everything out on the blackboard, that way we can all agree on what the app should look like.
Download The App
You can download the app here after the lecture. There will be no online walk through tutorial on how this app was made.
Table View Controllers
We can use a Table View Controller to display information about our list of reminders. What does a Table View Controller look like? Open up your Contacts app. That's a Table View Controller, listing all your contacts. Open up your Settings app. That's a Table View Controller, listing all the different settings you can change. Table View Controllers are just there to list things.
Table View Cells
Each "list-item" in a table view controller is called a TableViewCell. These cells are entirely customizable. This is why the table in your Contacts app looks different from the table in your Settings app, and they all look different from the table in your Reminders app (which actually has a button built in). In general, to make your favorite Table View, you configure a TableViewCell, and then tell your TableViewController how to use that Cell.
This is done most easily with Storyboards. In Xcode, you can drag-and-drop a TableViewController into your Storyboard. Then, you can add labels, buttons, and whatnot into the Prototype Cell field, like so:
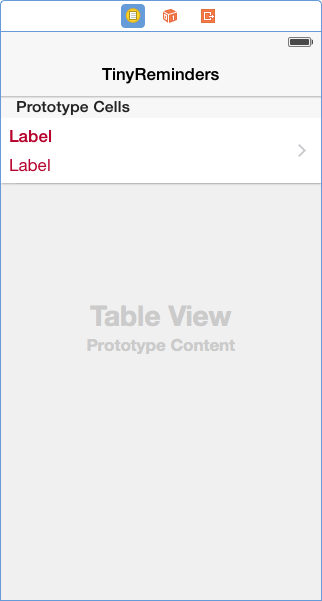
Ignore the title bar at the top. Your app will not have that by default.
You can even adjust the height of the TableViewCell. But, basically, what you have above is the prototype for what each cell in the TableView will look like. The final step is to make a class which subclasses UITableViewCell and set the Custom Class for your prototype cell to be your new class. If you click on your protoype cell (be careful not to click one of your labels), you should be able to see on your right hand side:
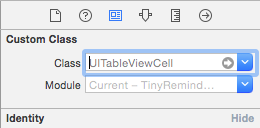
Under Custom Class, put the name of your subclass of UITableViewCell. Now, finally make the connections (control-click) from the UI to your new class. This way, you have a fully connected and implemented class that corresponds to that specific UITableViewCell. Congrats! That was easy.
While you're modifiying your UITableViewCell, go here:

The reuse identifier is an important identifier which we'll talk about in a few paragraphs from now. For now, fill it in with something handy like "reminder" or "contact" or "message" or something descriptive.
Now, similarly, you're going to want make a custom class for your UITableViewController. Do the same thing as above: make a new class which subclasses UITableViewController, and set the Custom Class for your table view controller to be your new subclass. Now, you can customize your Table View Controller!
The Cell Queue
Suppose you're really popular and you have 9,000+ contacts. Loading all of those contacts into the table view controller will legitimately murder your app with out-of-memory errors--you'll be making 9,000+ UITableViewCell's!
To solve this problem, the smart engineers at Apple figure out that, at any given point in time, you only really need around 10 or so average-sized UITableViewCell's--about 6 or so are displayed on the screen, and the rest are off-screen ready to be displayed at a moment's notice.
So, these 10 or so cells are the only cells used, in tandem with a reuse queue. Basically, when a cell goes far enough off screen, the cell is put in the reuse queue, since it's not needed at the moment. Then when a new cell is supposed to come on-screen, you can specify to the UITableViewController that you want to dequeue a cell from the reuse queue and repopulate it with the necessary information. This way, you don't need to make a bajillion cells--just a few.
One last problem is that your app uses several different reuse queues. If your app uses multiple tables, how will it know which queue it should dequeue from? Remember the reuse identifier I mentioned a few paragraphs above? That's how. We'll see a code example in a little bit which ties it all together.
Displaying the Cells
Table View Controllers required a data source in order to display information. On a very basic level, a table view controller requires two bits of information in order to display a list of stuff: how much stuff is there, and, at a given position, what information should be displayed there (i.e. what should be in the first cell, the second, etc). Any class that can answer these questions for the UITableViewController can subscribe to UITableViewDataSource.
Classes that subscribe to UITableViewDataSource should minimally implement the following method:
// This function is called when the table view controller wants to know
//   what information should be displayed at which cell in the table (i.e.,
//   what goes in the first, second, ..., nth cell, etc).
//
// Passes in something called an index-path. Basically, if you access
//   |indexPath.row|, you will get the number that the table view controller
//   is looking to get information for.
//
// Notice that this function actually *returns* a UITableViewCell.
//
override func tableView(tableView: UITableView, cellForRowAtIndexPath indexPath: NSIndexPath) -> UITableViewCell {
    ...
}
Suppose your information is kept in the form of some array of Objects. Then, one implementation of this function could look like:
var objects: [Object] = [ ... ]

override func tableView(tableView: UITableView, cellForRowAtIndexPath indexPath: NSIndexPath) -> UITableViewCell {
    // This line basically says: dequeue a cell with reuse identifier "object"
    //   (or whatever you specified above), and, if it's not nil, unwrap it and
    //   cast it as a MyTableViewCell. If it is nil, just make a new instance of
    //   MyTableViewCell instead.
    var cell = tableView.dequeueReusableCellWithIdentifier("object") as? MyTableViewCell ?? MyTableViewCell()
    var myObject = self.objects[indexPath.row]

    cell.objectTitle.text = myObject.title
    ...  // other information population

    return cell
}
Quick and easy: get a cell for reuse (or make a new one), get the object, transfer the data, return the cell. There's one more function that needs to be implemented for the Data Source to work well with the table view controller. The table view controller needs to know how many cells you have! You have to implement the following function:
override func tableView(tableView: UITableView, numberOfRowsInSection section: Int) -> Int {
    ...
}
This function passes you an argument called section and wants to know how many rows are in that section. Table view controllers can be sectioned! Look at your Settings app. It's a table view controller which comes broken into several different sections. This function passes in a section number (0, 1, 2, ...) and wants to know how many cells are in that section.
For an app like TinyReminders, there aren't sections--just one huge table. So, one implementation of this function could just be to give the size of all your data. For example:
override func tableView(tableView: UITableView, numberOfRowsInSection section: Int) -> Int {
    return self.objects.count
}
And you're done! You've implemented a table view controller with custom table view cells. Pat yourself on the back.
Navigation Controllers
What's the difference between the following two views?

The one the right has a title bar, of course. You've seen that title bar before! Grab your iOS device and open up the Settings app. The title bar is always at the top of that app. It has different titles, and sometimes it has buttons on the top-left and top-right corners. This title bar at the top helps you navigate your app, doesn't it?
The title bar is called a UINavigationBar, and it's part of a special view controller called a UINavigationController. A UINavigationController is a special class because it's known as a container class, which basically means it contains other view controllers.
Whoa, okay, this is a lot being thrown at you. Let's approach it slowly. Have you ever seen the movie Inception?

That movie is about dreams within dreams within dreams, several levels down (and also Leonardo DiCaprio NOT winning an Academy Award). Well views are the same way! You can have views inside views inside views. Think back to PhraseThrow: the labels and buttons were views inside a bigger view (the screen). We won't get into this too much right now, but views have hierarchy and can be nested.
A container view is just a view who doesn't do much except contain another view. So, the UINavigationController is a class that is mostly concerned with displaying another view, called its root view controller. It does some other stuff, like putting up a title bar, and maybe having some buttons, but it doesn't do anything else besides displaying another view.
So, in the above example, the image on the left is just one view. The image on the right is a view inside another view. Specifically, the image on the right is the view on the left inside a UINavigationController. Hence, UINavigationController is a container.
The Navigation Stack
Now, of course, navigation controllers should be able to provide navigation. In a navigation environment, new views are provided to the screen in a stack-manner. What does this mean?
Again, open up your Settings app. Suppose you hit General. A new view is pushed onto the stack, and a bar button item appears in the top left corner of your screen that says "< Settings". If you tap on that button, your view will be popped off the stack, and your previous view will take the forefront. Makes sense?
Navigating
Using Storyboards, let's add a second view to our app. Just drag a View Controller over from our collection of view items. Then, make a class that subclasses UIViewController and connect it to your new view controller (just like you did with the UITableViewCell and UITableViewController). Now, you can decorate that view controller however you look and tie it into the code for your new UIViewController subclass.
But now, suppose you want your second view controller to appear whenever someone taps a cell on your table view. Storyboards make that easy! Just right click on your prototype cell, click on the circle next to "selection" and just drag it over to your second view controller. You'll see three choices: modal, push, and custom.
A modal view is a temporary view that requires user attention. This is like what happens when you hit the New Tweet button or something like that. It pops up and you can't navigate out of it until you're done interfacing with it (like hitting a Cancel button). Selecting push will simply push the second view controller onto the navigation stack, just like we had previously discussed. We won't worry about custom segues. So, that's it! You made your first segue!
Bar Button Items
You can alternatively navigate using bar button items on your Navigation Bar--the top bar that appears when you use a UINavigationController. From your collection of view items, find the bar button item, and drag it to the right hand side of your navigation bar.
Now, you can play around with it. And modify it however you like. When you're ready to connect it, go to the Connections Inspector and under Triggered Segues, you should see a field called ``action". Again, drag the circle over to the view you want and select modal, push, or custom.