Lecture 10: Camera and Motion
This lecture will cover how to use an iPhone's camera, accelerometer, and gyroscope in an app. We will make an app called FaceTilt to learn these concepts.
FaceTilt Handout Code
Today in class, we will be making an app called FaceTilt, which uses both the Camera and the Accelerometer. You can download the handout for FaceTilt here. You can download the solution here.
Camera and UIImagePickerController
The main way to get an image picked from some source is to use a UIImagePickerController. This is a very powerful tool that let's us grab an image from the camera or the photo library and also edit the photo too! All we need to do is make the UIImagePickerController, set its sourceType (where we should grab the image from), and set ourselves as the delegate for the controller.
We need to subscribe to the UIImagePickerControllerDelegate so we can implement the method
imagePickerController(
        picker: UIImagePickerController,
        didFinishPickingMediaWithInfo info: [NSObject : AnyObject])
which is called when a user finishes picking (and possibly editing) an image. In addition, we need to subscribe to the UINavigationControllerDelegate protocol. This is because the UIImagePickerController is a subclass of UINavigationController, and Xcode is going to complain until you subscribe to that protocol. You don't actually have to implement any methods in this protocol; this is just to placate Xcode.
So, to set up our image picker, we just write
// Make the picker.
var imagePicker: UIImagePickerController = UIImagePickerController()
// Where should we get photos from?
if (UIImagePickerController.isSourceTypeAvailable(
            UIImagePickerControllerSourceType.Camera)) {
  imagePicker.sourceType = UIImagePickerControllerSourceType.Camera
} else {
  imagePicker.sourceType = UIImagePickerControllerSourceType.PhotoLibrary
}
// Set ourselves to received the edited photo.
imagePicker.delegate = self
So, in the above code, we instantiate a UIImagePickerController, and then check to see if the Camera is available (when is this a reasonable thing to check? When you're using a simulator! :P) and then sets the source type to be the camera, if possible, or the photo library otherwise. Afterwards, we just present the picker modally (remember how?). So, if the source type is set to camera (like on a real phone), a camera view will show up and prompt you to take a photo, like so:
Otherwise, it will just bring you straight to your Photos. In addition, one of the great parts of UIImagePickerController is that it has a built in editor to crop the photo. This works both for new photos taken and those that are chosen from the photo library. To enable it, just set
imagePicker.allowsEditing = true
The cropper looks like this:

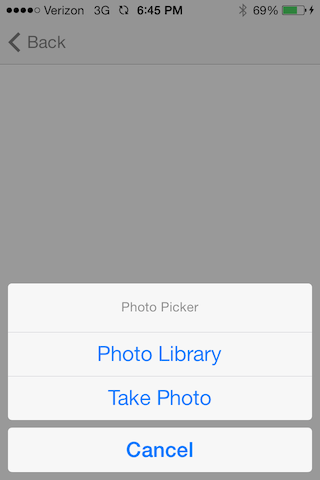
For devices that have both a camera and a photo library (like on a real phone), you should give the user an option of which one he or she wants to use. The best way to do this is with a UIActionSheet, which looks like this:
To instantiate an action sheet, we must first subscribe to the UIActionSheetDelegate protocol (yeah, we're going to subscribe to a lot of protocols today), and then when we want to display it, we say:
var actionSheet: UIActionSheet = UIActionSheet(
        title: "Photo Picker",
        delegate: self,
        cancelButtonTitle: "Cancel",
        destructiveButtonTitle: nil,
        otherButtonTitles: "Photo Library",
                           "Take Photo")
actionSheet.showInView(self.view)
The above code will create and show the action sheet described in the picture above. We can dissect the action sheet initialization call and see that each action sheet has a field for a title. In addition, there is a field for a cancel button title. The cancel button is provided by the action sheet, and will only appear if the given title is non-nil. In addition, there is a field for a destructive button title. This will be a title which is displayed in red, because it's destructive. Then, you can specify a bunch of other titles.
So, the main thing to take away is that the action sheet initialization is concerned with titles only and not any actual actions. We're just giving titles to display. So, when a user selects one of the buttons, how do we decide what action to take?
Well, the UIActionSheet will call the
actionSheet(actionSheet: UIActionSheet, clickedButtonAtIndex buttonIndex: Int)
method on its delegate. So, each button has its own index, which we can case on. The topmost button is given index 0. The one below it is given index 1, and so on and so forth. To see what button was pressed, we can borrow some code from the Apple Developer Docs:
func actionSheet(actionSheet: UIActionSheet,
                 clickedButtonAtIndex buttonIndex: Int) {
    println("The \(actionSheet.buttonTitleAtIndex(buttonIndex)) button was tapped.")
}
So, if we had a butotn called startButton and we wanted to grab a picture when we pressed it, enabling editing and using all of the action sheet stuff, we'd say:
@IBAction func selectImageButton(sender: AnyObject) { {
    var actionSheet: UIActionSheet = UIActionSheet(
            title: "Photo Picker",
            delegate: self,
            cancelButtonTitle: "Cancel",
            destructiveButtonTitle: nil,
            otherButtonTitles: "Photo Library",
                               "Take Photo")
    actionSheet.showInView(self.view)
}


func actionSheet(actionSheet: UIActionSheet, clickedButtonAtIndex buttonIndex: Int) {
    // user selected cancel
    if(buttonIndex == 0) {
        return
    }
    // create and setup UIImagePickerController
    var imagePicker: UIImagePickerController = UIImagePickerController()
    imagePicker.delegate = self
    imagePicker.allowsEditing = true
    // default to selecting photo from photolibrary
    imagePicker.sourceType = UIImagePickerControllerSourceType.PhotoLibrary

    // if the user selected camera and the camera is available
    if(buttonIndex == 2 &&
       UIImagePickerController.isSourceTypeAvailable(
               UIImagePickerControllerSourceType.Camera)) {
        imagePicker.sourceType = UIImagePickerControllerSourceType.Camera
    }
    // Show the image picker
    presentViewController(imagePicker, animated: true, completion: nil)
}
So, now, you'll want some functionality to actually use the photo in your app. To do this, remember we must implement the delegate method
func imagePickerController(
        picker: UIImagePickerController,
        didFinishPickingMediaWithInfo info: [NSObject : AnyObject])
This method will pass us an NSDictionary where we can grab our edited media. In addition, it is our responsibility to dismiss the picker--it does not automatically dismiss itself when the user is done. So, suppose we have a UIImageView where we'd like to display our grabbed image:
func imagePickerController(
        picker: UIImagePickerController,
        didFinishPickingMediaWithInfo info: [NSObject : AnyObject]) {
    var image: UIImage = info[UIImagePickerControllerEditedImage] as UIImage
    dismissViewControllerAnimated(true, completion: nil)
    self.pictureImageView.image = image
}
That's more or less all you can do with the UIImagePickerController; it's actually a very simple class. You can also use a different interface over the camera (like Snapchat) by setting imagePicker.showsCameraControls = false and then accessing the imagePicker. cameraOverlayView property with a view to overlay over the camera. You also have methods to access videos, and take pictures/videos programmatically.
Core Motion
CoreMotion is a framework which lets you deal with three important pieces of hardware on the iPhone: the accelerometer, the gyroscope, and the magnetometer. These three pieces of hardware deal with the three axes of the iPhone, which are best visualized like this:
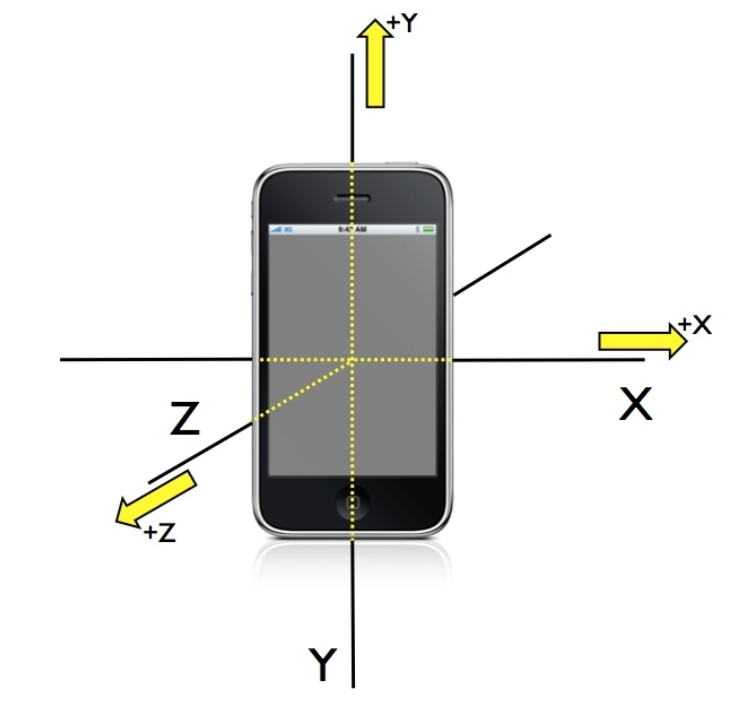
The accelerometer is concerned with how gravity acts on the iPhone. When you hold an iPhone vertically, looking at the above image of the iPhone axes, its accelerometer will tells us that our x-acceleration is 0, our y-acceleration is -1, and our z-acceleration is 0. What does this mean? It means that gravity is acting on the iPhone with the force of 1g downwards thorugh the y-axis. This may be a bit difficult to visualize, and it's totally okay if you don't.
If you hold your iPhone upside vertically, what will the accelerometer tell us about the acceleration? What about if we hold it horizontally, with the volumes buttons up? What if we put the iPhone face-up on a table? (Answers: (x, y, z) = (0, 1, 0); (x, y, z) = (1, 0, 0); (x, y, z) = (0, 0, -1)).
The gyroscope is concerned with how the iPhone rotates around any of these axes. If the iPhone is not moving at all, the gyroscope will not register any movement (unlike the accelerometer which will always register some acceleration).
The magnetometer is concerned with magnetic fields around the iPhone. We will not explore the magnetometer in this class, but in case you were wondering your iPhone has a magnetometer and you can do stuff with it.
To start reading data from any of these pieces of hardware, we must instantiate a CMMotionManager:
import CoreMotion
var motionManager: CMMotionManager = CMMotionManager()
Then, we need to tell the motion manager which data we want it to start collecting:
var motionManager: CMMotionManager = CMMotionManager()
...

self.motionManager.startAccelerometerUpdates()
self.motionManager.startGyroUpdates()
So, now, our Motion Manager is primed to give us the data that the accelerometer and the gyroscope are currently collecting. There are two ways to grab this data: push and pull. Pushing the data means as soon as the accelerometers gets a new data point, it calls a function that you define to handle what to do with the data. Ironically, this is not a very smooth way to handle this data, and Apple (and we) recommend that you do not use this method.
Instead, we suggest you pull the data. This means setting up an NSTimer to ask the hardware for updates at a regular interval. To do this:
// Set up the timer.
NSTimer.scheduledTimerWithTimeInterval(0.0, target: self,
                                            selector:"update:",
                                            userInfo: nil,
                                            repeats: true)
...

func update(timer: NSTimer) {
    // Obviously motionManager would have to be a property.
    println(self.motionManager.accelerometerData)
    println(self.motionManager.gyroData)
    // How to get the specific accelerometer data.
    println("\(self.motionManager.accelerometerData.acceleration.x),
                         \(self.motionManager.accelerometerData.acceleration.y),
                         \(self.motionManager.accelerometerData.acceleration.z)")
So, you could use this data to, say, move a ball across a screen based on how you tilt the iPhone.