CAE Project Assignment
Part 1: ProEngineer Drawing Instructions
The Wrench
Outline
Introduction
These instructions are designed to use ProEngineer V15 on the Hewlett
Packard computers in the CMU mechanical engineering cluster. If you are
using a different version of ProE or are using it in a different location,
then there may be some differences in your program.
These instructions are designed to take someone who has never used ProEngineer
through the process of creating a 2 and half dimensional part (a part that
is drawn in 2 dimensions and then extruded perpendicular to that plane).
These instructions are by no means a complete guide to using ProEngineer!
Once you understand these instructions, however, you should be able to
read the ProEngineer Parts instruction book in order to do more complex
3 dimensional parts.
[Return to Outline]
Drawing Instruction
Conventions
The following conventions are used in the ProEngineer Drawing Instructions:
| CAPITALS |
Menu Headings |
| Bold |
Menu Choices |
| Italics |
Enter text or a carriage return |
| Underlined |
Mouse button to be clicked in the ProE drawing window |
Lower lever level menus are indented from the upper level menus. For
example,
MAIN -> Environment
ENVIRONMENT -> Bell
means go to the menu labeled MAIN and select the menu choice Environment.
Then go to the ENVIRONMENT menu and select the menu choice Bell.
When entering text, you must first move the cursor over the window where
the text is to be entered.
<CR> indicates a carriage return.
It is important to use the correct mouse buttons: left, middle
or right.
[Return to Outline]
I. Start ProEngineer
Log in at any of the HP computers in the CMU Mechanical Engineering
cluster (except for hpme6 or hpme12) and open up ProEngineer Version 15
by going to the XTERM window and typing:
/data/ProE15/bin/pro15 <CR>.
It is important to type it with the upper and lower case letters as
shown. Note: Window choices in ProEngineer are on the right side of the
screen. Text is entered in a text window at the bottom of the screen. Additional
information about the menu choices is given in yellow text in the text
window as you move the cursor over each menu choice.
[Return to Outline]
II. Set Up The
Drawing Environment
MAIN -> Environment
ENVIRONMENT -> Bell
The check mark next to Bell will disappear indicating that it is no
longer selected.
ENVIRONMENT -> Grid Snap
A check mark next to Grid Snap will appear to indicate that it has been
selected.
ENVIRONMENT -> Done-Return
[Return to Outline]
III. Create Datum Planes
Datum planes are infinite planes which are used as references. It is
necessary to create the three default datum planes when starting a new
drawing.
MODE -> Part
ENTERPART ->Create
In the text window at the bottom of the screen, the program will prompt
you to name the part. It should be
typed as one word, for example: wrench1
PART-> Feature
[Return to Outline]
IV. Establish
the Type of Drawing
The type of drawing you will be doing is a 2 dimensional sketch which
will be drawn on Datum3.
FEAT -> Create
[Return to Outline]
V. Draw
the Part in 2 Dimensions
General Drawing Instructions:
You should read over and be familiar with the following general drawing
instructions before drawing the wrench.
- To Draw Straight Lines:
SKETCHER -> Sketch
GEOMETRY -> Line
LINE TYPE -> 2 Points
You may now draw lines in the picture. To mark the first point of a
line, click with the left mouse button where you want the line to
start. To mark the second point of a line, click with the left mouse
button where you want the line to end. You may draw the third, fourth,
etc. points of the line with each click of left mouse button. Hit the middle
mouse button to end the line.
- To Draw Arcs:
SKETCHER -> Sketch
GEOMETRY -> Arc
ARC TYPE -> Ctr/Ends
You may now draw arcs in the picture. Begin by marking the center of
the arc with the left mouse button. Mark one end of the arc with
the left mouse button. Move the cursor around until the arc you
want is outlined in red. When the arc you want is outlined, mark the second
end of the arc with the left mouse button.
- To Delete a Line or Arc:
SKETCHER -> Delete
You can now delete items in the picture by clicking on the item you
want deleted with the left mouse button. A line must be finished
(by clicking with the middle mouse button) before it can be deleted.
- To Undelete a Line or Arc:
SKETCHER -> Delete
DELETION -> Undelete Last
Each time you click on the Undelete Last choice, it will undelete
the previously deleted item.
Drawing the Wrench:
Note: In the following figures, the lines and arcs shown in the thick
lines are the ones which you should draw during each step. The thinner
lines are lines which were created in previous steps. Do not worry that
it does not look like a wrench when you are drawing it!!! The program will
properly proportion the part automatically when you add the dimensions
later on.
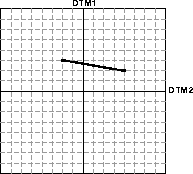
| Begin by drawing a line exactly as shown in Figure 1. To do this, choose
the following:
SKETCHER -> Sketch
|

Figure 1
|
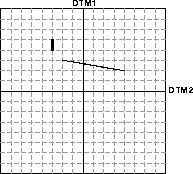
| Move the cursor one square up and one spuare left (from the last position)
and click once with the left mouse button. Your screen should now
look like Figure 2. |

Figure 2
|
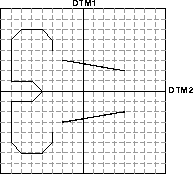
| Continue drawing lines in this way, clicking each time with the left
mouse button at each corner, until you have drawn the shape in Figure
3 with light blue lines. Click once with the middle mouse button
to end this line.
NOTE: It is very important to draw lines following the grid in the manner
shown in Figure 3. Pay close attention to the horizontal and vertical spacing
of the segments that make up the wrench head. It looks arbitrary, but the
particular path shown actually reduces the difficulty of dimensioning the
part later.
|

Figure 3
|
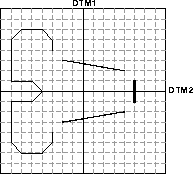
| Draw a straight line as shown in Figure 4. To do this, click once with
the left mouse button at one end of the line, click once with the
left mouse button at the second end of the line and then click once
with the middle mouse button to end this line. |

Figure 4
|
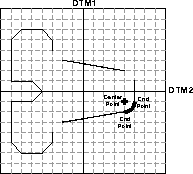
| Draw an arc as shown in Figure 5. To do this, choose the following:
SKETCHER -> Sketch
Mark the center of the arc with the left mouse button. The center
of the arc will be highlighted in red. Mark one end point of the arc with
the left mouse button. Move the cursor around until the arc you
want is outlined in red. When the arc you want is outlined, mark the second
end point of the arc with the left mouse button.
|

Figure 5
|
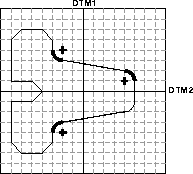
| Draw arcs shown in Figure 6. To do this, mark the center of the arc
with the left mouse button. The center of the arc will be highlighted
in red. Mark one end point of the arc with the left mouse button.
Move the cursor around until the arc you want is outlined in red. When
the arc you want is outlined, mark the second end point of the arc with
the left mouse button. |

Figure 6
|
[Return to Outline]
VI. Dimension the Part
After you have the part drawn properly, you must now dimension it. This
will assign the actual length and size of the features. Dimensioning is
done in two steps:
- The first step is to indicate which portions of the drawing you want
dimensioned.
- The second step is to modify the values of the dimensions to the values
that you want.
General Dimensioning Instructions:
You should read over and be familiar with the following general dimensioning
instructions before dimensioning the wrench. To indicate which portions
of the drawing you want dimensioned, choose the following menu choice:
SKETCHER -> Dimension
- To Dimension Between Points Which Are Horizontal or Vertical
To Each Other:
Choose one point with the left mouse button. The point chosen
will be highlighted in red. Choose the second point with the left mouse
button. Both points chosen should now be highlighted in red. Choose the
location where you want this dimension to be shown with the middle mouse
button. The dimension between the two points will appear.
- To Dimension Between Points Which Are Not Horizontal
or Vertical To Each Other:
You can provide the horizontal and vertical dimensions of diagonal lines
separately.
To dimension the horizontal distance between points, choose one point
with the left mouse button. Choose the second point with the left
mouse button. Choose a location either directly above, or below, the
points where you want the horizontal dimension to be shown with the middle
mouse button.
To dimension the vertical distance between points, choose one point
with the left mouse button. Choose the second point with the left
mouse button. Choose a location either to the right, or the left, of
the points where you want the vertical dimension to be shown with the middle
mouse button.
- To Dimension the Radius of an Arc:
Choose the arc with the left mouse button. Choose the location
where you want this dimension to be shown with the middle mouse
button.
- To Dimension Distances to the Datums:
To provide dimensions to the datums, choose a point on your drawing
with the left mouse button. Choose a datum with the left mouse
button (by clicking either on the Datum line or the DTM label). Choose
the location where you want the dimension to be shown with the middle
mouse button.
To Delete a Dimension:
SKETCHER -> Delete
DELETION -> Delete Item
(This will be highlighted by default when you choose SKETCHER ->
Delete) You can now delete dimensions in the picture by clicking
on the dimension label (for example, sd1) you want deleted with the left
mouse button. Be careful! If you click on a line or arc in the figure,
then that line or arc will be deleted!
To Undelete:
SKETCHER -> Delete
DELETION -> Undelete Last
Each time you click on the Undelete Last choice, it will undelete
the previously deleted item.
Dimensioning the Wrench:
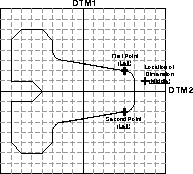
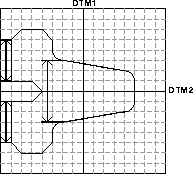
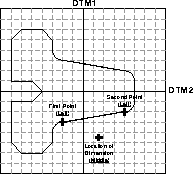
| Dimension the vertical distance as shown in Figure 7.
To do this, choose the following:
SKETCHER -> Dimension
Choose one point with the left mouse button. The point chosen
will be highlighted in red. Choose the second point with the left mouse
button. Both points chosen should now be highlighted in red. Choose the
location where you want this dimension to be shown with the middle mouse
button. The dimension between the two points will appear.
|

Figure 7
|
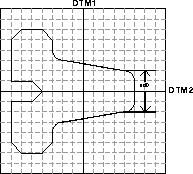
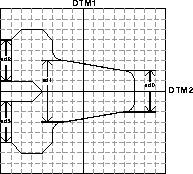
| The dimension between the two points will appear where you clicked
with the middle mouse button. Your drawing should now look like
Figure 8. The dimension will be labeled with the variable name sd#. |
Figure 8
|
| In the same way, dimension the three vertical distances as shown in
Figure 9. |
Figure 9
|
| Your drawing should now look like Figure 10. |
Figure 10
|
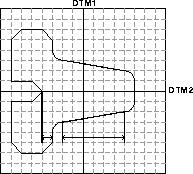
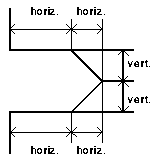
| Dimension the horizontal components of the diagonal distance as shown
in Figure 11.
To do this, choose one point with the left mouse button. Choose
the second point with the left mouse button. Choose a location either
directly above, or below, the points where you want the horizontal dimension
to be shown with the middle mouse button.
|
Figure 11
|
| Dimension the horizontal components of the two diagonal distances as
shown in Figure 12. |
Figure 12
|
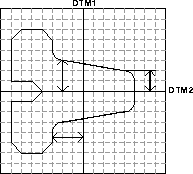
| Using the same procedures, dimension the horizontal distances, and
the horizontal components of the angled lines as shown in Figure 13.
Dimension the vertical components of the diagonal lines as shown in
Figure 13.
To dimension the vertical components of the diagonal lines, choose one
point with the left mouse button. Choose the second point with the
left mouse button. Choose a location either directly to the right,
or to the left of the line where you want the vertical dimension to be
shown with the middle mouse button.
|
Figure 13
|
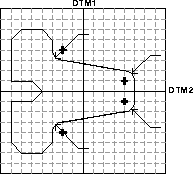
| Dimension the two vertical distances and one horizontal distance from
the points shown to the Datums as shown in Figure 14.
To do this, choose the point on your drawing with the left mouse
button. Choose the datum with the left mouse button. Choose the
location where you want the dimension to be shown with the middle mouse
button.
|
Figure 14
|
| Dimension the horizontal and vertical distances of each of the four
chamfered edges of the wrench jaw as shown in Figure 15. |
Figure 15
|
| Dimension the two curved edges of the handle as shown in Figure 16.
To do this, choose the arc with the left mouse button. Choose the
location where you want this dimension to be shown with the middle mouse
button. |
Figure 16
|
Choose
SKETCHER -> Regenerate
ProE should accept the drawing with the message 'Regeneration completed
successfully.' At this stage, all the dimensions are wrong, but you will
fix them in the next section. Take a one minute break. If ProE did not
accept the drawing, then there is probably a message about an 'Underdimensioned
section' or 'Extra dimensions found'. Review your geometry and exactly
where you dimensioned the part.
[Return to Outline]
VII. Modify the Dimensions
Set the jaw span at 1/2". Decide what all the other dimensions must be.
Modify all the dimensions on the ProE drawing.
SKETCHER -> Modify
Click on the dimension label you want to modify with the left mouse
button. The dimension to be modified will turn red in the drawing. Enter
the new value for the dimension in the text window followed by a <CR>.
The dimension will turn white after it has been modified.
[Return to Outline]
VIII. Regenerate
the Drawing
SKETCHER -> Regenerate
After you have dimensioned the drawing you must regenerate the drawing.
This will make the program check to make sure the drawing has been correctly
dimensioned.
If the drawing is correctly dimensioned, the text window will respond,
"Regenerate completed successfully." The wrench will now be properly
proportioned and should look like a wrench!
If the drawing is not correctly dimensioned, you will get an error statement.
All errors must be corrected before proceeding.
[Return to Outline]
IX. Clean up the Drawing
Move the location of the dimensions so that the diagram and all dimensions
are easy to read.
MAIN -> Environment
ENVIRONMENT -> Grid Snap
The check mark next to Grid Snap will disappear indicating that
it is no longer selected.
ENVIRONMENT -> Done-Return
SKETCHER -> Geom Tool
GEOM TOOLS -> Move
MOVE ENTITY -> Dimension
Click with the left mouse button on the dimension you want to
move. The dimension will be highlighted with a red box.
Move the cursor until the red box is where you want the dimension to
be located.
Click with the left mouse button to establish the new position
of the dimension.
Move the location of the dimensions so that the diagram and all dimensions
are easy to read.
Then choose
[Return to Outline]
X. Save the Part
MAIN -> Dbms
DBMS -> Save
Hit the carriage return to keep the same name for your figure.
The text window will respond, "wrench{group-number} has been saved."
The part is saved as wrench{group-number}.prt.
DBMS -> Done-Return
[Return to Outline]
XI. Print
a 2-Dimensional View
PART -> Modify
Click on the wrench with the left mouse button. The dimensions
of your drawing will reappear.
PART -> Interface
INTERFACE -> Export
EXPORT -> Plotter
PLOTTERS -> Postscript
PLOT EDIT -> Plot
PLOT SIZE -> Variable
The program will prompt you, "Enter X dimension of the paper (inches):"
Enter 8.5 <CR>.
The program will prompt you, "Enter Y dimension of the paper (inches):"
Enter 11 <CR>.
[Return to Outline]
XII. Export the Part
In order to do the second part of the CAE project (Finite Element Analysis),
it is necessary to export the drawing. You must do this step before you
can do the second part of the CAE project!!!
PART -> Interface
INTERFACE -> Export
EXPORT -> IGES
Hit the carriage return in order to keep the same name for your
drawing.
There should already be a check mark next to Surfaces.
If there is not a check mark next to Surfaces, then click on
EXPORT OPTS -> Surfaces so that it does have a check mark next
to it.
[Return to Outline]
XIII. Exit the Program
MAIN -> Exit
[Return to Outline]
Developed from a web page by Michael Paisner by Christopher Steiling,
Joseph Chan, and Richard Chin
Christopher
Steiling, Joseph Chan, Richard Chin
