Lecture 12: App Store, Unit Testing, Debugging
In today's lecture, we're actually going to focus very little on making our own app, and focus more on some of the high-level aspects of app development. The reason for this is because the App Store has reasonably high standards for quality in the apps that are submitted. While we're not actually going to submit an app to the App Store today, we can talk about how to complete the process, and how real professionals get their apps ready to meet the real world.
Preparing for the App Store
Getting Started: Things You Need
The first thing that everybody needs is a developer account. Everyone should have this already, considering we made you sign up for it before the class even started.
The next thing that you will need is to sign up for the iOS Developer Program. This program costs $99/year, which really blows. For this class, you will never ever need to do this. Do not do this for the sake of this class. Only do this if you're planning on putting personal apps that you make outside of this class onto the App Store.
So, if you're looking to put personal apps that you make outside of this class onto the App Store, be prepared to drop a fat Benjamin on this one. In addition to being able to put your apps on the App Store, you also get the iOS betas, which usually come out multiple weeks in advance. Pretty cool!
Getting into the iOS Developer Program
Anyways, if you want to sign up for the iOS Developer Program, you'll
need to go to Apple
Developer Programs and hit Enroll Now.
Hit Continue on the next page, and then you're given a choice:
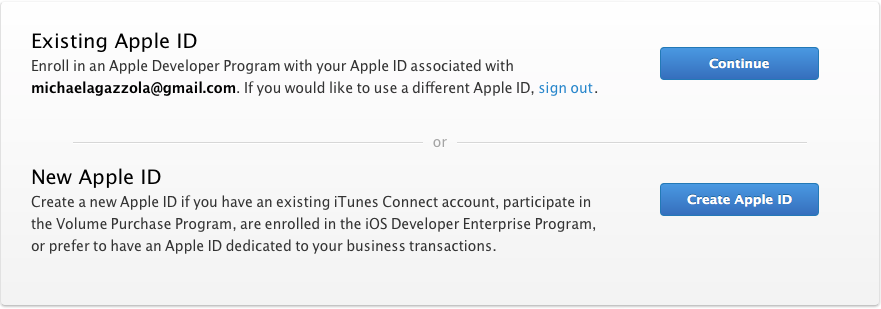
Do what you want for this, but I personally just tied it to my existing Apple ID, just to keep things simple. Now, Apple will ask you if you're a person or a company:

Try not to think too hard about this one.
Enter in any of the necessary information. Make sure you choose iOS
Developer Program, and not the Mac or Safari programs. Those are bad.
Get the iOS program. Put in your credit card info so you can officially sell
your soul to Apple and poof
you're a
developer.
So, now, through the Member Center (accessed through developer.apple.com), you have everything you'll need to manage your developer account from here.
Getting Xcode to Play Along
In what has been a fairly recent push towards unification, Xcode plays a major part in the non-code aspects of iOS development now. If you use your Apple ID with Xcode, tasks such as running apps on actual hardware and uploading your app to the App Store become simple one-or-two-step processes (mind you, these tasks used to be difficult and confusing).
So, if you haven't already (most of you should have), open up Xcode. You don't need to start a new app, but you can go to Xcode > Preferences (alternatively, Cmd+,). Go to Accounts and make sure your Apple ID is there. If not, add it. From here, you should be able to see information such as which development teams your Apple ID is a part of. For example, I'm part of the CMU development team, and my own personal developer program, so I show both:
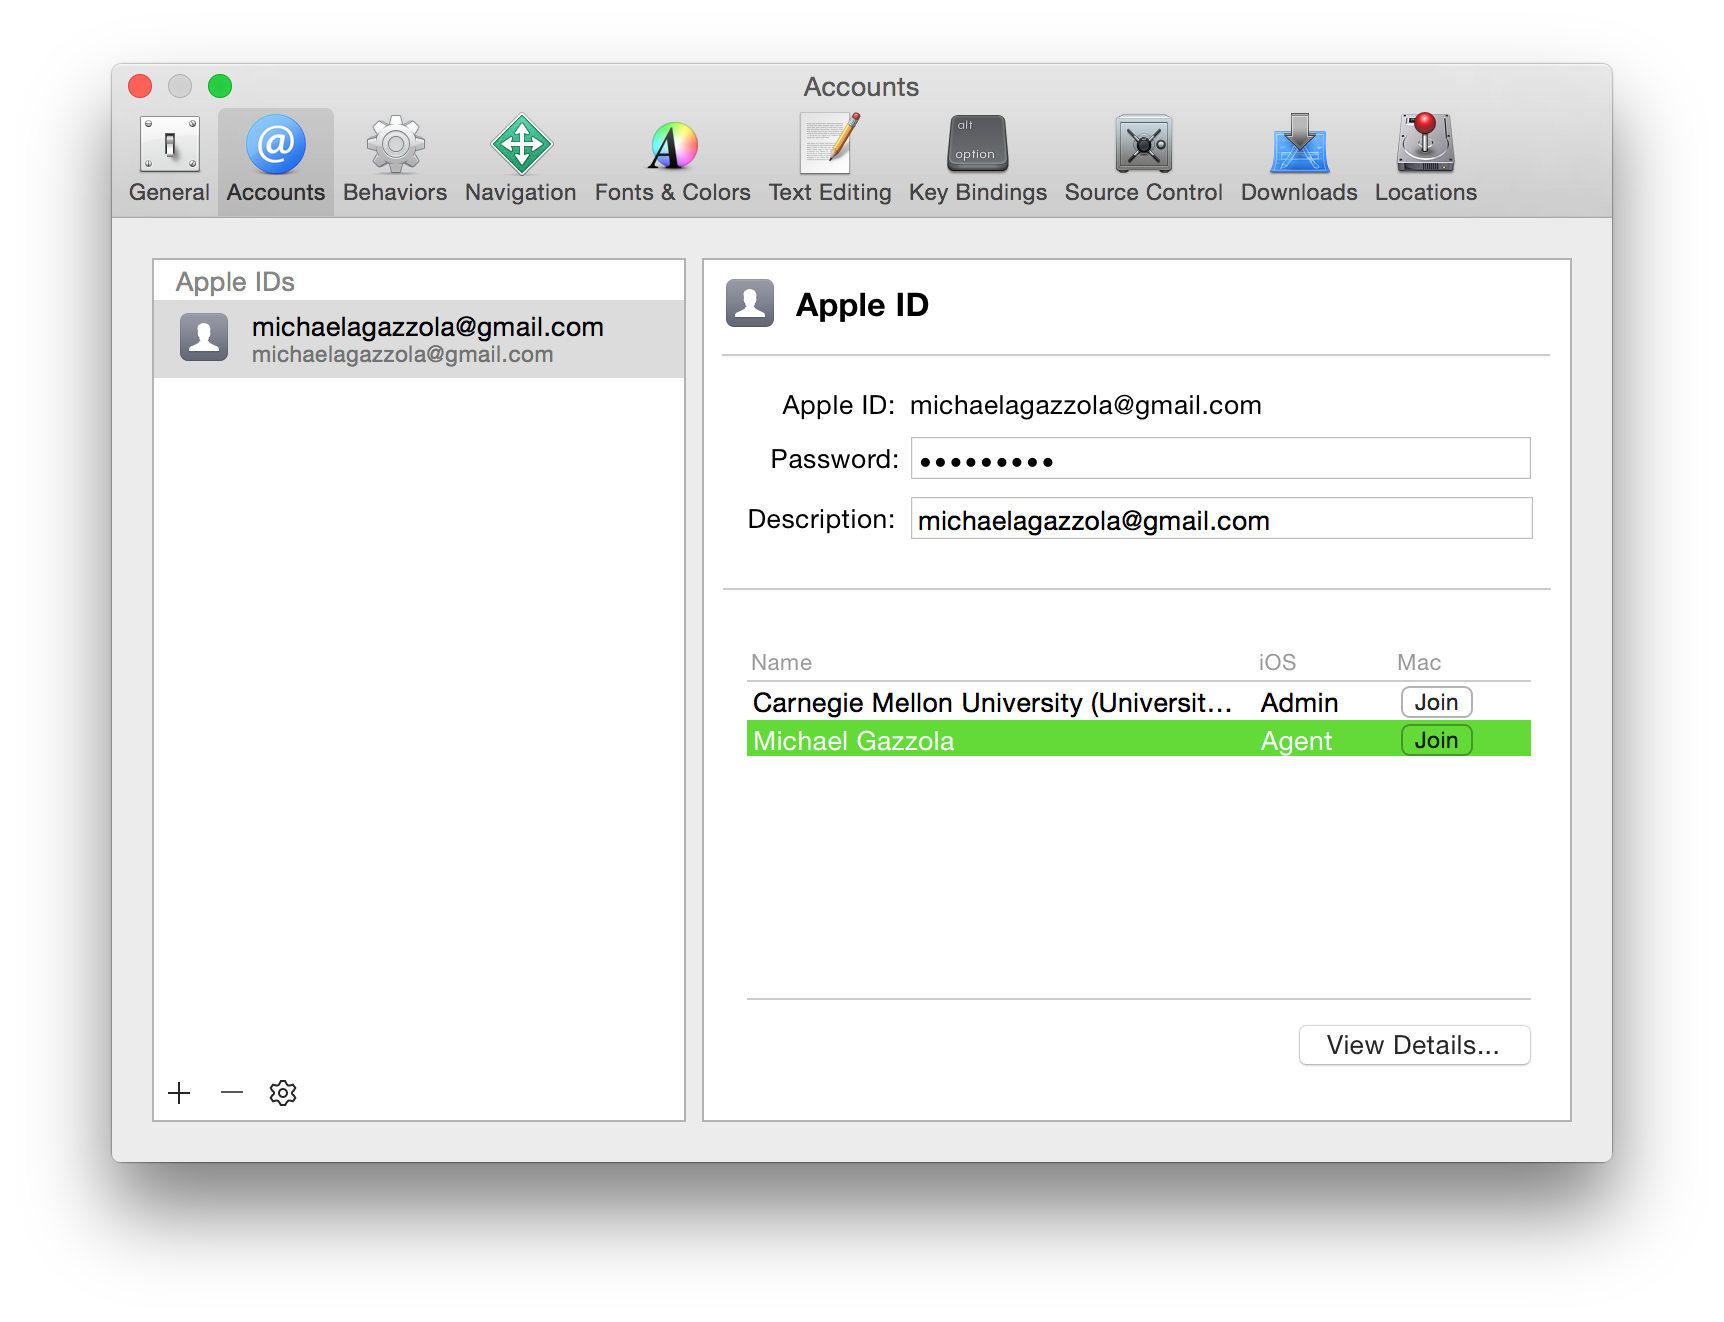
If you're wondering, an Agent is an owner of the account. An admin is someone that can add or remove people from the team, but is ultimately not the owner of the team account.
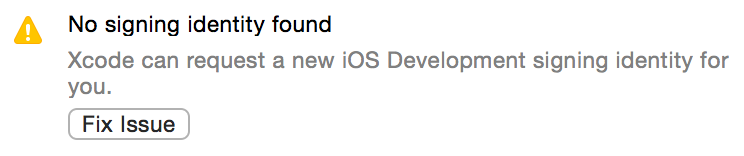
So, if you're all set, let's try running an app on actual hardware now. This used to be very difficult, and it included provisioning profiles, certificates, UDIDs, and a whole mess of stuff.
Now, plug your iOS device into your laptop and select it from the Build For dropdown box (where we select which iPhone simulator we'd like to run). You'll notice if you go to your app's main page that you'll see this:
Well, push the button.
Okay...
That was easy. Now you're all set. Have fun running apps on your device.
App Target and App Icons
Most apps have app icons[citation needed]. To figure out which app icons you'll need, you'll need to decide what platforms your app will run on. This is known as your App Target. Only iPhones running iOS 8? Or how about all iPhones and iPad from iOS 6 forward? Maybe just iPads running iOS 7. How about CarPlay?
If you go to your app's main page and look under Deployment Info, you'll see a ton of important options that can help you with this:
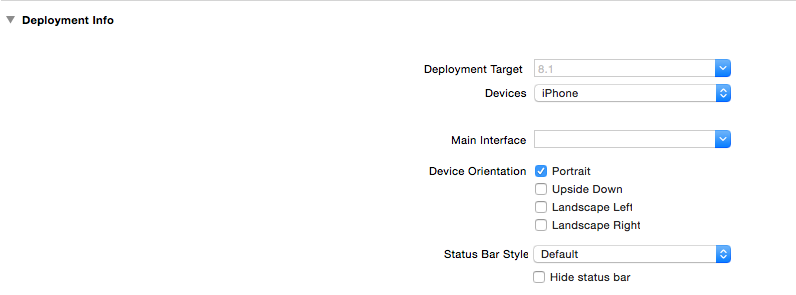
For this app, we are only releasing on iPhones running iOS 8.1. I can alternatively specify my app to just iPads, or Universal. We can even specify OSs back down to iOS 6.0.
So, once you know your Target, you know what app icons you'll have to use. You're probably going to have to make your own app icons. There are strict guidelines on these app icons that can be summed up pretty succinctly: "Try to use non-interlaced, non-transparent PNGs." Now, what size do we make these icons?
The first thing you might get nervous about is the fact that I consistently use the plural form, icons. Yes, you will need multiple icons. Go to the Images.xcassets folder--a folder which we very rarely go to. There is an item in there called AppIcon. Click on it to display it in the main view:
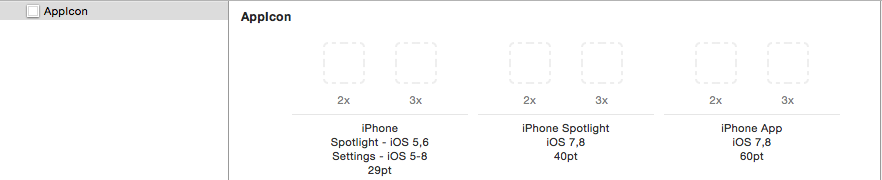
Those are all the app icons you need to provide for your app. Mind you, this app was created just for iPhone, so there are only the iPhone app icons. If you were making a Universal app, it'd look a good bit scarier. But for now, let's focus on the 6 icons we have on our plate.
The two icons on the left refer to the Settings icons for your app, which are traditionally 29x29 in size. These icons appear when you open up Settings and see your app there. This is alternatively the size of the Spotlight icons, pre-iOS 7. There are usually 3 options for this category: 1x, 2x, and 3x.
What do these number mean? Well, remember, the iPhone 4S was given a Retina display many years ago. This raised the resolution of the phone by so damn much that we could fit 4 times the amount of pixels into the same physical area on-screen. So, 1x 29pt very simply means a 29x29 icon. But, 2x 29pt demands 4 times the amount of pixels, so it ends up being a 58x58 icon (because 58 is 2 times 29).
Similarly, the iPhone 6 Plus has such a farking high resolution that we can fit (kinda-sorta-not-really) 9 times the amount of pixels into the same physical area on-screen. This gives birth to 3x, which demands 9 times the amount of pixels. So, 3x 29pt is an 87x87 icon.
So, you'll need 3 different icons, just for your Settings icon. Mind you, if you give an incomplete set of icons (for example, just the 1x 29pt), iOS will try to upscale the images as necessary, but these traditionally look ugly as eff, so your best off making your own icons.
You'll probably want to do the same for your Spotlight icons and your actual app icons!
Note: here is a website that will generate all the different app icon sizes for you.
Unit Testing
In general, we've never talked about how to test your apps. Sure, we could just run the app and make sure it works, but that's somewhat hard to do when your app is, say, Facebook, or something bigger.
Unit testing is a way of testing your app that works by testing tiny bits of your code. These tiny bits are, more often than not, a single function. But, if you cover enough tiny bits of your code, in theory your code should work perfectly!
However, in practice this doesn't happen, and it's somewhat hard to define "enough tiny bits". Often times, you'll see large projects use different kinds of tests such as end-to-end tests, or integration tests. And even then, we still hear of instances of Facebook being down for a half hour or something like that. Testing sufficiently is hard to do.
But, for now, we'll just focus on unit testing in the scope of our very tiny, very hard-to-fail apps. In general, you'll want to write a few unit tests for each function. Moreover, you should have a couple of positive tests--tests where the function is expected to succeed and carry out its task--and a couple of negative tests--tests where the function is expected to fail, and should do so gracefully (by returning nil or something to that effect).
In addition, there is a programming paradigm known as Test-Driven Development, which is basically where you write the tests first, and then write the code to fulfill the tests. This will force you to not only write very hardcore, water-proof tests, but should theoretically also ensure correctness in your program. However, this doesn't really happen so much in practice.
Unit Tests in Xcode
Suppose you write the following:
struct Stack<T> {
    private var items = [T]()

    mutating func push(item: T) {
        self.items.append(item)
    }

    mutating func pop() -> T {
        return self.items.removeLast()
    }

    nonmutating func count() -> Int {
        return self.items.count
    }
}
This is a very basic Stack implementation. We'll talk a bit about the syntax used during lecture, but if you're not in lecture today, you'll want to look up the difference between a struct and a class in Swift, Generics, and the mutating keyword.
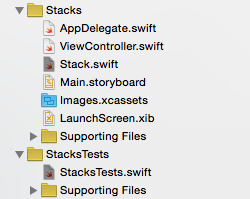
How can we test this? Well, Xcode gives you absolutely everything you need to test your app. Look at your project directory:
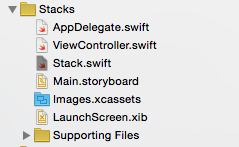
Wait there's a folder below it!
Xcode already generated a file while looks a bit like this:
import UIKit
import XCTest

class StacksTests: XCTestCase {

    override func setUp() {
        super.setUp()
        // Put setup code here. This method is called before the invocation of each test method in the class.
    }

    override func tearDown() {
        // Put teardown code here. This method is called after the invocation of each test method in the class.
        super.tearDown()
    }

    func testExample() {
        // This is an example of a functional test case.
        XCTAssert(true, "Pass")
    }

    func testPerformanceExample() {
        // This is an example of a performance test case.
        self.measureBlock() {
            // Put the code you want to measure the time of here.
        }
    }

}
We'll explain what this all means in a second. But notice that StacksTests is a subclass of XCTestCase. As I'm sure you can imagine, XC stands for XCode. Xcode has provided us with classes used to test our code!
Let's start out by clearing this file:
import UIKit
import XCTest

class StacksTests: XCTestCase {

}
We're going to write everything from scratch.
Now, when Xcode builds an app for running, and when Xcode builds an app
for testing, these are two different apps built in two different ways. And
so, Xcode has two different build targets: one for running and one for
testing. You'll notice this if you go to any .swift file:
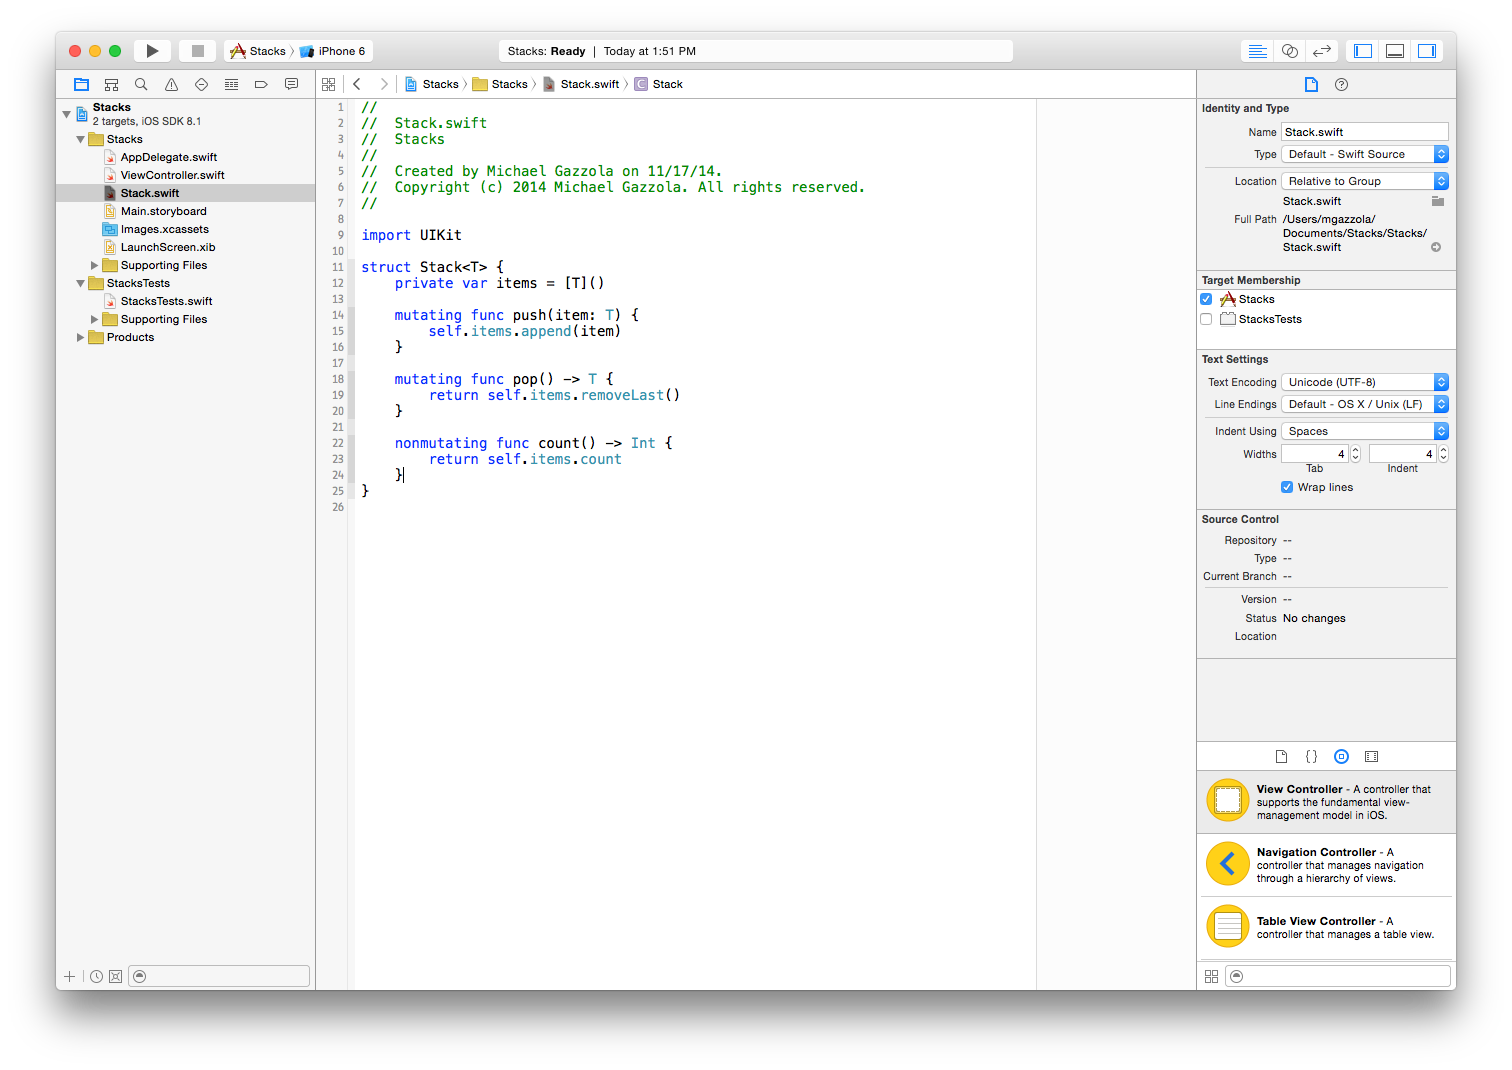
Go to the File Inspector:
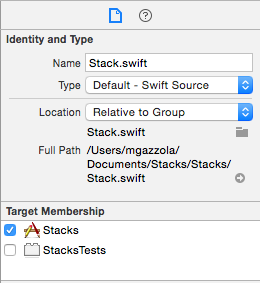
And check out Target Membership.
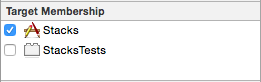
Those are your two build targets. So, we want our Stacks.swift file which contains our Stack implementation to be part of our test target. That way, we can actually use it in tests. So, let's check that unchecked box and return to our StacksTest.swift file.
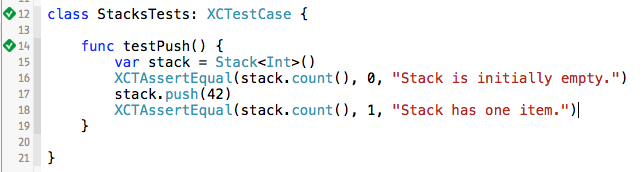
Now, we are ready to write our first test. Tests in Xcode are function that begin with the word test. For example:
class StacksTests: XCTestCase {

    func testPush() {
        var stack = Stack<Int>()
        XCTAssertEqual(stack.count(), 0, "Stack is initially empty.")
        stack.push(42)
        XCTAssertEqual(stack.count(), 1, "Stack has one item.")
    }

}
In general, every testing method you will ever use will begin with XCTAssert. You have a ton of XCTAssert functions such as XCTAssertEqual, XCTAssertTrue, XCTAssertFalse, XCTAssertGreaterThan, XCTAssertGreaterThanOrEqualTo, XCTAssertNil, XCTAssertNotNil, and XCTAssertNotEqual, among others.
This test is very straightforward. It makes an Int stack, and then checks if its empty. Then, it pushes an item and makes sure that it's not empty. Pretty simple. How do we run this test now? Cmd+ U. The iOS Simulator will boot up and then your app will shut down. What happened? Check Xcode:
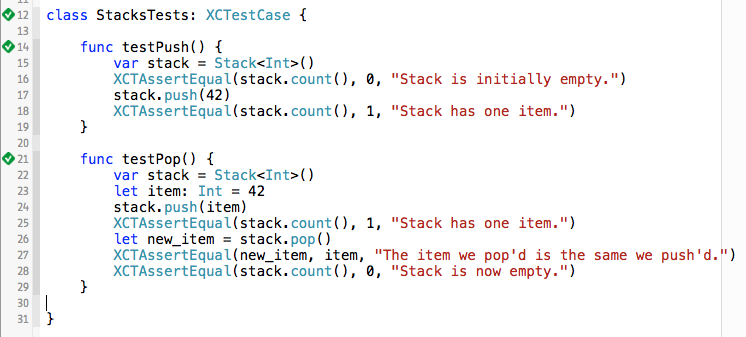
Looks like our test suite passed! Let's try testing pop now:
class StacksTests: XCTestCase {

    func testPush() {
        var stack = Stack<Int>()
        XCTAssertEqual(stack.count(), 0, "Stack is initially empty.")
        stack.push(42)
        XCTAssertEqual(stack.count(), 1, "Stack has one item.")
    }

    func testPop() {
        var stack = Stack<Int>()
        let item: Int = 42
        stack.push(item)
        XCTAssertEqual(stack.count(), 1, "Stack has one item.")
        let new_item = stack.pop()
        XCTAssertEqual(new_item, item, "The item we pop'd is the same we push'd.")
        XCTAssertEqual(stack.count(), 0, "Stack is now empty.")
    }
}
Now Cmd+U to test!
Awesome! Now, let's add one more test--what's supposed to happen if we pop on an empty stack? Ideally nothing should happen. Let's write the test:
    func testPopOnEmpty() {
        var stack = Stack<Int>()
        XCTAssertEqual(stack.count(), 0, "Stack is initially empty (sanity).")
        stack.pop()  // Does this return anything??
        XCTAssertEqual(stack.count(), 0, "Stack is still empty.")
    }
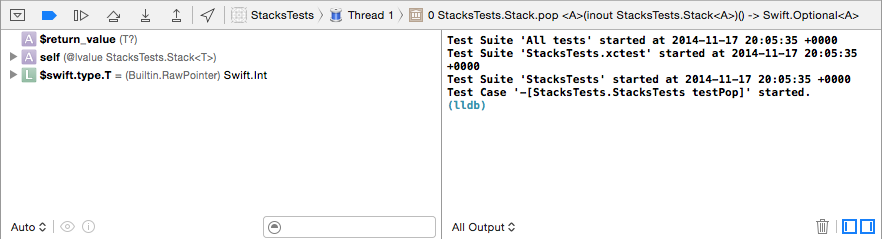
And now we test it! Our test fails with error fatal error: can't removeLast from an empty Array. Looks like our unit tests have found a fatal error in our code! We should rewrite our Stack implementation to look like this:
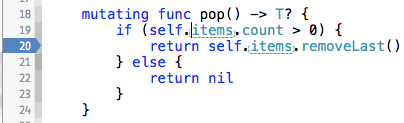
    mutating func pop() -> T? {
        if (self.items.count > 0) {
            return self.items.removeLast()
        } else {
            return nil
        }
    }
And then we rewrite our pop tests as follows:
func testPop() {
var stack = Stack<Int>()
let item: Int = 42
stack.push(item)
XCTAssertEqual(stack.count(), 1, "Stack has one item.")
let new_item: Int? = stack.pop()
XCTAssertNotNil(new_item, "Our pop'd item is not nil.")
XCTAssertEqual(new_item!, item, "The item we pop'd is the same we push'd.")
XCTAssertEqual(stack.count(), 0, "Stack is now empty.")
}
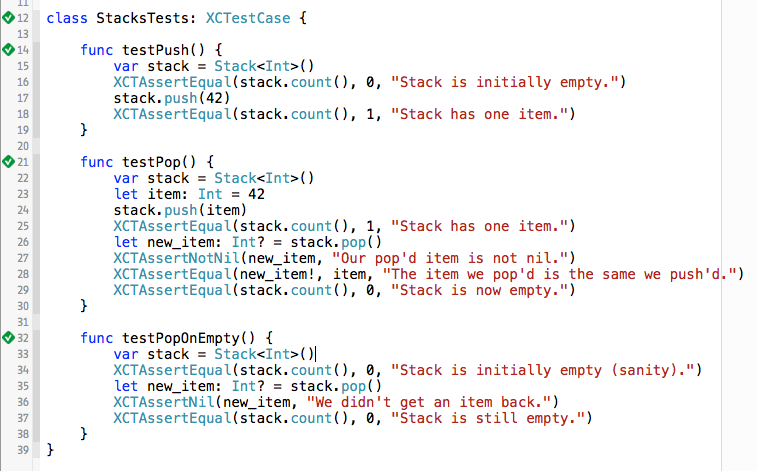
func testPopOnEmpty() {
var stack = Stack<Int>()
XCTAssertEqual(stack.count(), 0, "Stack is initially empty (sanity).")
let new_item: Int? = stack.pop()
XCTAssertNil(new_item, "We didn't get an item back.")
XCTAssertEqual(stack.count(), 0, "Stack is still empty.")
}
And then we test...
Sweet.
Two more things to talk about with unit testing. What happens if a test fails? Not if a test crashes, like we just witnessed--I mean if an assertion is wrong? Well, we can make an easy example of this:
func testWillFail() {
    XCTAssertTrue(false, "Will fail.")
}
Xcode says:

Xcode will tell you exactly which test(s) you failed, which is fairly helpful. Finally, you'll notice that almost every test we've written (except for the degenerative one we just wrote) pretty much begins with the same line of code, var stack = Stack<Int>(). Why do we repeat this same line of code all the time
There should be a function that is called every time a test starts, and sets up each test environment the same way. Indeed, in most unit test environments, this is a feature known as the setUp function. Similarly, there is a function called tearDown, which is called every single time a test finishes. So, used in action:
class StacksTests: XCTestCase {

    var stack: Stack!

    override func setUp() {
        super.setUp()
        // Put setup code here. This method is called before the invocation of
        // each test method in the class.
        self.stack = Stack()
    }

    func testPush() {
        XCTAssertEqual(self.stack.count(), 0, "Stack is initially empty.")
        self.stack.push(42)
        XCTAssertEqual(self.stack.count(), 1, "Stack has one item.")
    }

    func testPop() {
        let item: Int = 42
        self.stack.push(item)
        XCTAssertEqual(self.stack.count(), 1, "Stack has one item.")
        let new_item: Int? = self.stack.pop()
        XCTAssertNotNil(new_item, "Our pop'd item is not nil.")
        XCTAssertEqual(new_item!, item, "The item we pop'd is the same we push'd.")
        XCTAssertEqual(self.stack.count(), 0, "Stack is now empty.")
    }

    func testPopOnEmpty() {
        XCTAssertEqual(self.stack.count(), 0, "Stack is initially empty (sanity).")
        let new_item: Int? = self.stack.pop()
        XCTAssertNil(new_item, "We didn't get an item back.")
        XCTAssertEqual(self.stack.count(), 0, "Stack is still empty.")
    }

}
Pretty nice. These features get super helpful when you're testing very complex structures with lots of dependencies.
UI Testing
Recall that unit testing is used to test models--more specifically, it's meant to test the ``units" (little bits) of your code. However, there's more to testing than testing your Stacks and Queues. You might want to test that your Storyboard works, for example. You might want to test that pushing a certain button forces a certain action, or maybe that a certain gesture causes a special function to run. I other words, you need to ensure that your UI works. That's where UI testing comes in.
Unfortunately, we won't be covering UI testing today, but there is a framework called KIF (Keep It Functional) which utilizes the iOS Accessibility Framework to effectively create UI Testing. More information on UI Testing can be found here.
Debugging
Wow, this lecture is getting very long. Okay, there are two main ways that I like to use to debug things in Xcode: breakpoints, and good ol' print statements.
We'll talk about each.Breakpoints
You may have seen this used in lecture once or twice to debug a program. Breakpoints are the most accidentally used features in Xcode. To set a breakpoint in your code, simply click on the line number in your window.
Now, whenever your code reaches that point in execution, it will pause, right there. Then, the bottom bar of Xcode will pop up.
You can see a lot about your app at this very point in time here. For exmple, on the left hand side of the bottom bar, you see a hierarchy of all the objects currently in memory right now. It might be helpful to poke through this tree.
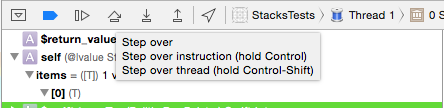
What's most important, I think, is the stepping functionality that Xcode gives you.

Hover over each of these icons to see exactly what they do. You can step through your code line-by-line, or even instruction-by-instruction. You can step into functions or even step over functions. Hovering over some of the options you have will also tell you how to use the functionality in different ways:
It's a pretty powerful tool, especially for catching this notoriously hard to find bugs.
To disable a breakpoint, simply click on it. It will be somewhat "faded out", but that's meant to be a reminder to you as the developer that you once set a breakpoint there (and might want to do it again later if the code is still buggy). You can remove that reminder also, if you like, simply by right clicking and hitting Disable Breakpoint.
Print Statements
Print statements are like picking your nose. Everybody does it, but if you get caught doing it, you look silly. Use your println statements as much as you like--I'm sure there's not much I can say about this subject.
There are a few built-in variables which could be helpful to your print statements. The variable __LINE__ returns the line of code it appears in. The variable __FILE__ returns the file. The variable __COLUMN__ is self explanatory, and so is the variable __FUNCTION__. There is no variable for __CLASS__, but you can achieve identical functionality by saying reflect(self).summary.
So, those may or may not be helpful. Go crazy.
Actually Submitting on the App Store
Okay, so at this point, you've sold your soul to Apple, you've unit tested and debugging your app to oblivion, and you think you're ready to submit it to the App Store. You should triple-check that your app meets the App Store Review Guidelines before you even can begin to consider your app "done". However, suppose you've done all that already. There's one very very important question you must ask yourself?
Do you want to make bank?
You're going to want to go to iTunes Connect. Surely you received a link to it in one of the emails you received when you bought the iOS Developer Program. If not, just sign in to itunesconnect.apple.com. iTunes Connect is Apple's media distribution service, and so will be very helpful in distributing your app.
Once you sign in, go here:
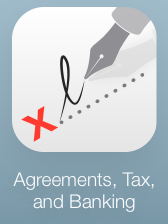
That's Agreements, Tax, and Banking, or just Bank, as I like to call it. This is where you go to make sure Apple sends you the money you earned from your app.
There are three main sources of revenue for apps: Paid Apps, In-App Purchases, and iAd. We won't really talk about how to set them up, but you will need to sign some agreements in order to pocket the revenue that your app generates. If you go to Bank, you'll see you can Request two contracts. One of them is to make money on Paid Apps, and the other is to make money on iAds.
You'll need to agree to both and set up Contact, Bank, and Tax info in order for the agreement to go through. Once you do though, you're ready to receive money for your app.
Once you take care of that, you can back out to iTunes Connect and then go here:
Now you set up the information for your app as it will be displayed on the App Store. Create a new app and fill out the form here:

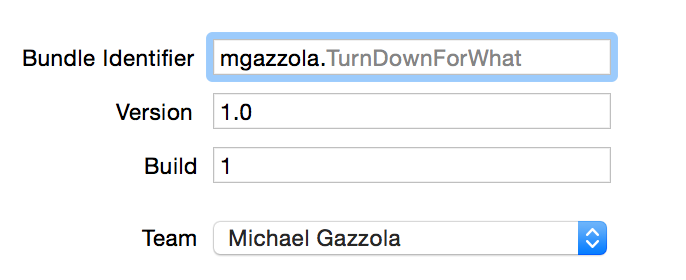
Note that information such as Bundle Identifer and Version must be exactly the same as its given in Xcode. If you don't, your app will not upload properly to the App Store.
Once you create the basic information about your app, you get to fill out all the advanced information about your app. This includes pics/videos of your app in action, a description (usually a few paragraphs), a rating (should 4 year olds be playing your app), and other things. What is definitely necessary for you to submit your app, though, is:
- A name for your app
- A description (a couple of paragraphs, usually) for your app
- An icon for your app, sized 1024x1024px
- At least 1 screenshot of your app, portrait or landscape, in either retina or non-retina resolution, with or without the status bar
If you go to Pricing, you can set the price of your app. Apple provides pricing to you in tiers, where the lowest tier is a free app, and the highest tier is $999.99.

Try not to pick the highest tier. That's how you ensure that nobody buys your app.
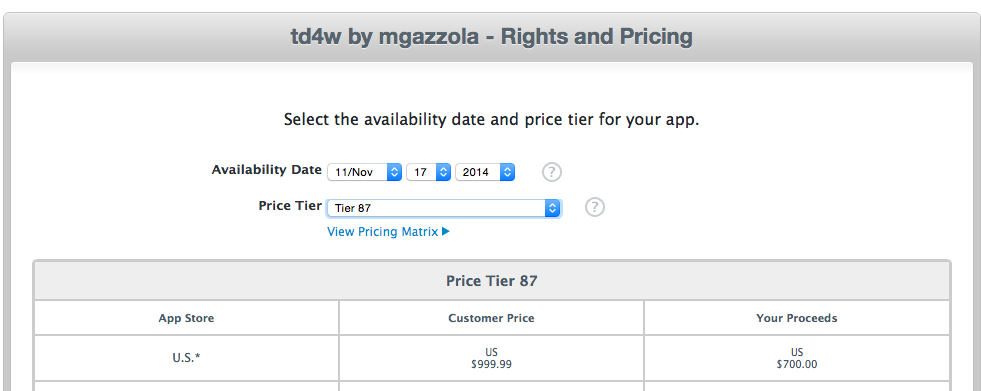
It's also good to know the Apple actually tells you how much money they're skimming off the top of each purchase made on your app. So, it's upfront (if you thought Apple didn't make some sort of profit off your app, you were sorely mistaken).
So, go crazy and fill out the information as needed. At some point, you will need to upload your app. This is, believe it or not, done through Xcode and not through iTunes Connect. In Xcode, set your build target device to iOS Device, like so:

Then, go to Product > Archive. Xcode will Archive your project, and a window will pop up displaying all the archives of your app.
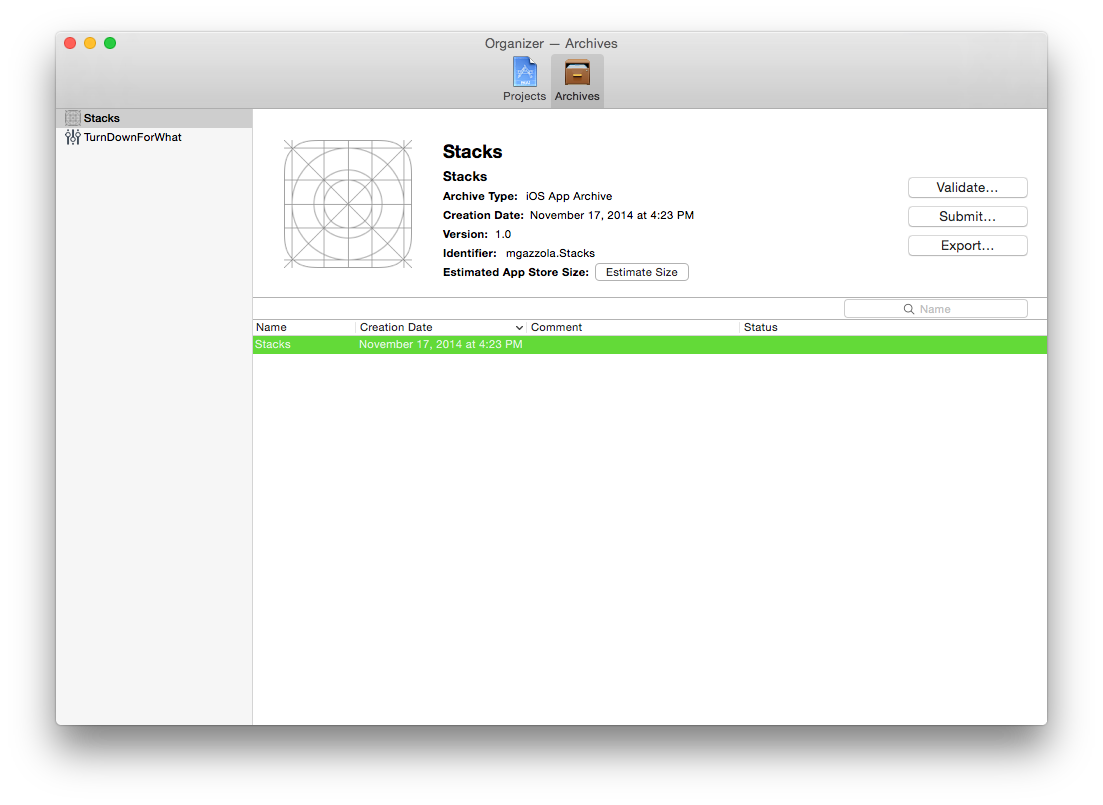
You should Validate your app, and then Submit your app. Now, your app should be totally ready to submit to the App Store. Once you're done with all the information in iTunes Connect, you can Submit for Review!

Though maybe before you do that, you should quadruple check that you meet the App Store Review Guidelines.
The Review Process
Your app will go through different states in the review process. In order, they are:
- Upload Received
- Waiting For Review (this usually takes the longest amount of time)
- In Review
- Approved
- Processing for App Store (once your availability date arrives)
- Ready for Sale (it's in the App Store!)
You'll have to go through parts (but not all!) of this process every time you want to update your app. However, the review process is usually much quicker (24 hours versus up to a week sometimes).
Good luck!