- PHP must be compiled with MySQL or PostgreSQL support
(
--with-mysqlor--with-postgresql) - (for ACID v0.9.6b10-b11)
PHP must also be compiled with the BCMath library enabled
(
--enable-bcmath) - If graphing functionality is desired, GD support must
also be compiled (
--with-gd) and for native whois query support socket functionality must be enabled (--enable-sockets)
II. INSTALLATION
The following is a step-by-step list of installing ACID.
- [OPTIONAL] Confirm Database Logging
Prior to deploying ACID, successful logging of alerts from
the sensor (be it Snort, logsnorter, etc.) to the database should be confirmed.
ACID can only manage alerts stored in the database. Consult the
appropriate documentation for database logging configuration specifics.
- Snort -- README.database included in the source distribution or at http://www.snort.org/documentation.html
- logsnorter -- README included in distribution
In order to confirm successful logging, use the command-line database clients (or a graphical front-end tool) to execute the following SQL queries:[for MySQL] $ echo "SELECT count(*) FROM event" | mysql snort_db -u root -p (Note: the connection parameters used with mysql may vary with your configuration. In this case, the mysql client will connect to the 'snort_db' database as the 'root' user prompting for a password) This command should return output similar to the following. count(*) 1 [for PostgreSQL] $ echo "SELECT count(*) FROM event" | psql -d snort_db -U root -W (Note: the connection parameters used with psql may vary with your configuration. In this case, the PostgreSQL client will connect to the 'snort_db' database as the 'root' user prompting for a password) This command should return output similar to the following. count ------- (1 rows)In this example, both the MySQL and PostgreSQL database contained 1 alert. If no alerts are found in the database (i.e. a 0 is returned), then (obviously) nothing has been successfully logged. - Confirm Database Permissions
Confirm that the proper database permissions have been set for the database
and tables used by ACID. The minimum permissions for each relation (table)
are listed in Table 1.
Table 1: Required database permissions on tables used by ACID Database Permission T
A
B
L
ESELECT INSERT UPDATE DELETE acid_ag X X X acid_ag_alert X X X acid_event X X X X acid_ip_cache X X X X data X X X detail X encoding X event X X X icmphdr X X X iphdr X X X opt X X X reference X X X X reference_system X X X X schema X sensor X X sig_class X X X X sig_reference X X X X signature X X X X tcphdr X X X udphdr X X X Table 2: Required database permissions on sequences used by ACID (PostgreSQL and MS-SQL) Database (sequence) Permission T
A
B
L
ESELECT INSERT UPDATE DELETE acid_ag_ag_id_seq X X reference_ref_id_seq X X reference_sys_ref_system_id_seq X X sensor_sid_seq X X sig_class_sig_class_id_seq X X signature_sig_id_seq X X The following SQL statement is an example of assigning permissions to database entities (tables).
[MySQL and PostgreSQL] : GRANT select ON schema TO acid_user (Gives the SELECT privilege to the 'schema' table to user 'acid_user') - Install Apache and PHP
Install Apache, PHP (and GD). There are many configuration options whose
specifics are best addressed by the appropriate package's documentation.
Here are several suggestion.
- The PHP build that is used must have support for
- either MySQL or PostgreSQL
- GD
- socket functionality.
The following is an example of the necessary options to the ./configure script when building from source.
       ./configure [your config options] --with-mysql --with-gd --enable-sockets

       (MySQL support)

       ./configure [your config options] --with-pgsql --with-gd --enable-sockets

       (PostgreSQL support)
In the case where building PHP from source is undesirable or inconvenient (e.g. Windows) binary distributions can be used. However, most do not provide some of the required functionality (e.g. GD or PostgreSQL support). To add this functionality, PHP dynamic module loading (extensions) can be used. Examine the following PHP document for the installation of extensions under Windows, http://www.php.net/manual/en/install-windows.php.
- PHP will execute more efficiently if run as an Apache module (--with-apache in the ./configure script). However, it is possible to run PHP as a CGI application and under different web servers. It should be noted that these configurations are untested.
- The PHP build that is used must have support for
- Modify the PHP Configuration
Edit the PHP configuration file, php.ini, and make the following changes:
[All OSes]
- Set the 'display_errors' variable to 'off' (display_errors = off) for production deployments of ACID. This setting will prevent debugging messages from being included inline to the HTML. If it is desired to to have some debugging messages sent inline, then it is recommended to at least set the 'error_reporting' variable to 'E_ALL & ~E_NOTICE' (error_reporting = E_ALL & ~E_NOTICE).
- (for ACID <= v0.9.6b21)
Set the 'register_globals' variable to 'on'
(
register_globals=On)
[Windows]
- Set the 'SMTP' variable to refer to your SMTP server.
- Set the 'session.save_path' variable to a temporary directory writable by the web server (e.g. c:\temp).
[UNIX]
- Set the 'sendmail_path' variable to the full path to your mail transfer agent (MTA) such as sendmail.
- Start the Web Server
Start the web server.
- Install ADODB 1.2+
(for ACID v.0.9.6b2+)
Uncompress and install ADODB 1.2+. This process should be as simple as
copying the files into a directory viewable by the web server and
PHP. In the case of Apache, any child directory of 'DocumentRoot'
set in httpd.conf.
[UNIX] $ cp adodb112.tgz /home/httpd/html $ cd /home/httpd/html $ tar xvfz adodb112.tgz $ cd .. - Install the Graphing Library
PHPlot 4.4.6+
(for ACID v. [0.9.6b9 - 0.9.6b21])
Uncompress and install PHPlot 4.4.6+. Again, this installation should
involve only copying the files into a directory viewable by the web
server and PHP.
    [UNIX]
      $ cp phplot-4.4.6.tar.gz /home/httpd/html
      $ cd /home/httpd/html
      $ tar xvfz phplot-4.4.6.tar.gz
      $ cd ..
JPGraph 1.8+ (for ACID v.0.9.6b22+) Uncompress and install JPGraph 1.8+. This installation should involve copying the files into a directory viewable by the web server and PHP.[UNIX] $ cp jpgraph1.8.tar.gz /home/httpd/html $ cd /home/httpd/html $ tar xvfz jpgraph.1.8.tar.gz $ cd ..See the JPGraphREADMEfile for additional documentation. - [OPTIONAL] Confirm GD Support
(for ACID v. [0.9.6b9 - 0.9.6b21])
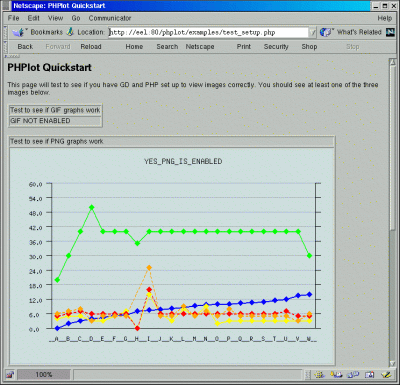
Confirm that GD support has been properly configured in PHP by opening a browser and attempting to view the PHPlot diagnostics page examples/test_setup.php (the full URL will depend on where PHPlot was installed; e.g. http://mywebserver/phplot/examples/test_setup.php). If PHP has been configured correctly, at least one chart graphic should be seen on this page. Otherwise, PHP has not been configured correctly with GD support.The figure below (Figure 1), shows PHP with GD configured for PNG support (but not GIF).
Figure 1: PHPlot Diagnostic Page
- Install ACID
Uncompress and install ACID by copying and expanding it to a directory
viewable by the web server and PHP.
[UNIX] $ cp acid-0.9.6.tar.gz /home/httpd/html $ cd /home/httpd/html $ tar xvfz acid-0.9.6.tar.gz $ cd acid - Verify Cookie Support
Verify that cookie support in the browser is enabled.
[Netscape 4.*]
- Choose 'Edit->Preferences' from the menu bar
- Click on the 'Advanced' tree item and select either "Accept all cookies" or "Only accept cookies from the same server as the page being viewed" from the cookie options.
[Mozilla 0.9.3]
- Choose 'Edit->Preferences' from the menu bar
- Click on the "Privacy and Security->Security" tree item and select either "Enable all cookies" or "Enable cookies for originating web site only" from the cookie options.
[IE 5.*]
- Choose 'Tools->Internet Options' from the menu bar
- Click on the 'Security' tab
- Choose the appropriate web content zone
- In the 'Security Settings' window, find and choose 'enable' (or 'prompt') for the options 'Allow cookies that are stored on your computer' and 'Allow per-session cookies (not stored))'
III. CONFIGURATION
- Configure ACID
The file 'acid_conf.php' controls the configuration of ACID.
Note: 'acid_conf.php' is PHP code which will be included in each ACID page request. As such, it is imperative that the opening '<?php' and closing '?>' tags not be removed from the file. Likewise, no extra lines can be found before or after these '<?php' '?>' delimiters.
The general format of each configuration entry is:All conventions of the PHP language (e.g. comments) apply to the 'acid_conf.php' file. For example, the comment characters are either a '//' or '/* ... */'.
// comment #1 /* multi-line comment #1 multi-line comment #2 */$<variable name> = <value>;Variable names are case sensitive.The following options will need to be set with site specific information in order for ACID to function properly. Aside from this minimal configuration, there are a number of other settings which can be tweaked. Please see http://acidlab.sourceforge.net/acid_params.html for an exhaustive list.
o $DBlib_path : full path to the ADODB installation (Note: do not include a trailing '\' character) o $DBtype : type of the database used ("mysql", "postgres") o $alert_dbname : alert database name o $alert_host : alert database server o $alert_port : port where the database is stored o $alert_user : username for the alert database o $alert_password : password for the username [OPTIONAL for alert archiving support] o $archive_dbname : archive/backup database name o $archive_host : archive database server o $archive_port : o $archive_user : "root"; o $archive_password : "mypassword"; [OPTIONAL for chart support] o $ChartLib_path : full path to the PHPlot install (Note: do not include a trailing '\' character) o $chart_file_format : graphic format to use for generated charts ("png", "jpeg", "gif"). The selected format should have displayed correctly with the PHPlot diagnostic page (see Step 8) [OPTIONAL for Snort portscan pre-processor support] o $portscan_file : full path to a Snort portscan log file - Run ACID for the first time
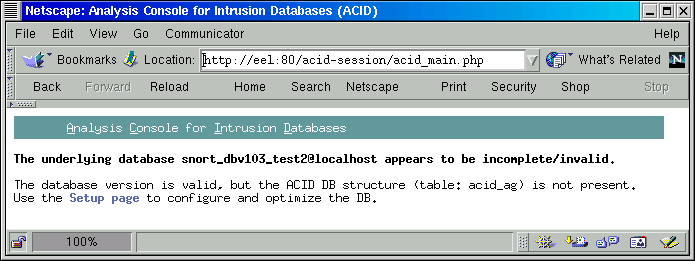
Open the acid_main.php page in a browser. If the any database changes
are required, ACID will prompt for action.
For new databases, several ACID specific tables will need to be created.
When running ACID for the first time, an error message will appear:
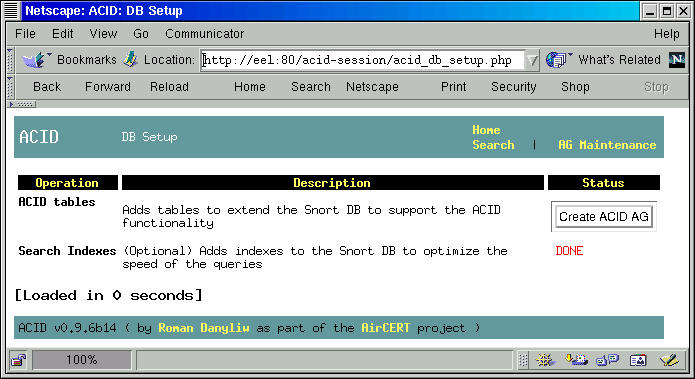
Click on the "Setup page" link to be brought to the DB configuration page (acid_db_setup.php). This next page will facilitate the creation of the necessary tables. Click on the "Create ACID AG" buttons as seen below.
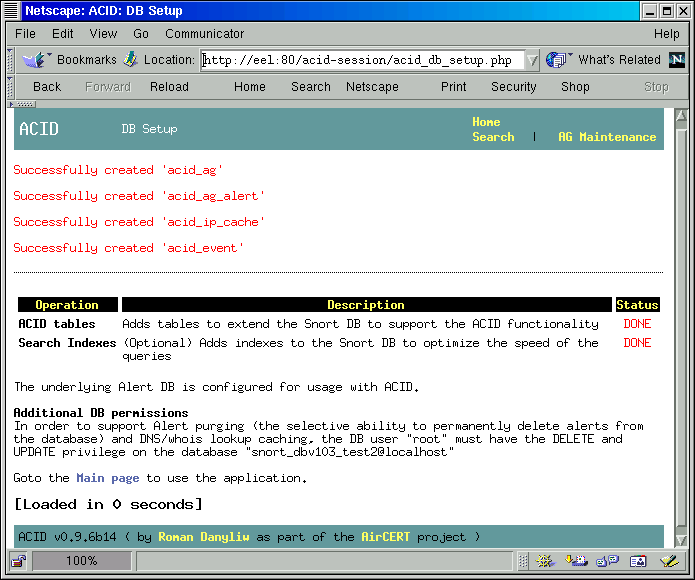
After the tables are created, ACID will return status indicating success.
- Read Security Information Read the security notes about deploying ACID.
IV. SECURITY
As with any software, an appropriate deployment strategy must be employed.
The following are some recommendations and notes about the security of ACID.
- Run ACID only on encrypted connections for many of the queries could return
potentially sensitive information. The use of HTTPS (SSL/TLS) is highly
recommended (mod_ssl -- http://www.modssl.org
provides this functionality for Apache).
- There is currently no authentication or access control mechanisms in ACID.
However, both can be provided by tweaking the underlying components. Use
native web server authenticate techniques to identify users connecting
to the ACID pages (e.g. basic or digest HTTP authentication or X.509 certificates
with mod_ssl).
Authorization can also be provided through per-file or per-directory access control methods specific to the web server (e.g. through .htaccess files in Apache). Furthermore, the specific actions which can be performed on the individuals alerts in the database can be controlled to a certain degree through the privileges assigned to the underlying database user configured in ACID. For example, the ability to delete alerts can be easily controlled by granting or revoking the DELETE SQL privilege from the ACID database user. Thus, by create two separate users each set in two different instances of ACID, a read-only and a full-access configuration can be established.
- While the primary interface of ACID is through a web browser, proper file
permissions still need to be set on the local file system. These permissions
will protect against potential unauthorized viewing or modification of
ACID files by users who have local accounts to the web server.
- ACID is currently _beta_! No real work has been done in validating any input.
This means that the code may allow arbitrary access to the underlying database.
Exercise extreme caution in deploying this application in a public area.
- The alert (and archive) database passwords configured in ACID are stored in clear-text in the file system. Their security is contingent on the settings of the local file system permissions. Furthermore, these passwords are hard-coded in the application and are only as secure as any other PHP "code" from being exposed in unparsed form. Improper configurations of the web server can result in the exposure of these passwords if unparsed PHP files are returned.