Using WS-FTP
In order to hand in homework using FTP, you will need to complete the steps listed below.If you are using a CMU cluster machine, begin with step 1 below. Otherwise, open the FTP program on your computer and then skip to step 3 below. Here is a quick summary of the steps. Details for each step follow this listing.
- CMU only: Open an FTP session window
- Connect to andrew.cmu.edu
- Navigate within andrew.cmu.edu
- Transfer
your files to the folder on andrew.cmu.edu.
Be sure you select ASCII formatting before making the transfer. - Revise your submitted files
- Keep a
copy of your work on diskette.
Remember that copies of your work stored on andrew.cmu.edu can provide a backup (or saved copy) of your work but nevertheless, it is a good idea to keep copies of all of your programs on diskettes.
Here are the steps in detail.
- CMU only: Open an FTP session window.
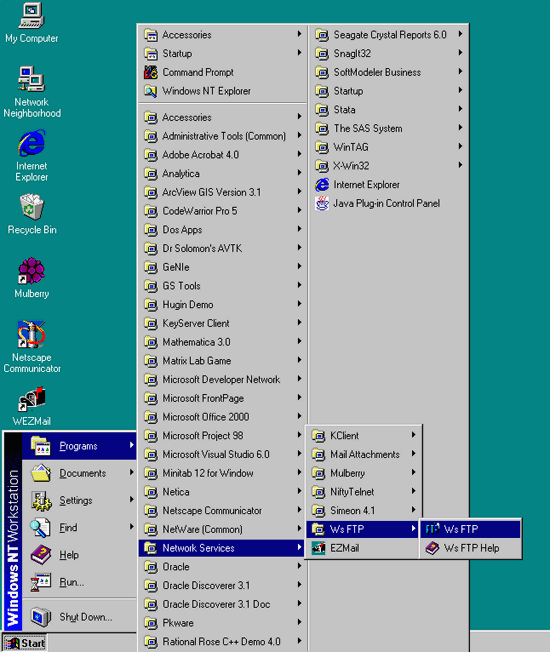
To open an FTP session window on a PC cluster machine at CMU/Heinz, do the following:- Left click on Start, which is at the bottom lefthand corner of
your screen.
A menu will appear. - Left click on Programs. A menu will appear.
- Left click on Network Services. A menu will appear.
- Left click on WsFTP. A menu will appear.
- Left click on WsFTP.
- Left click on Start, which is at the bottom lefthand corner of
your screen.
- Connect to andrew.cmu.edu.
After the WS-FTP program loads, a Session Properties window appears similar to the one shown below.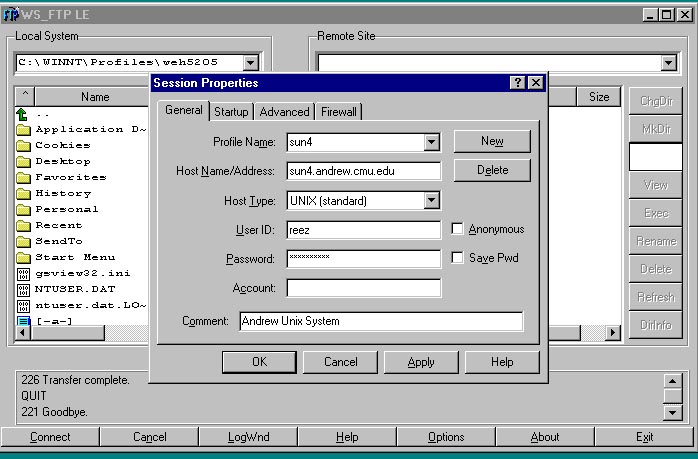
Make an FTP connection to andrew.cmu.edu by doing the following:
- Left click New button in the Session Properties window.
- Enter unix.andrew.cmu.edu in the Host Name/Address text
box.
To accomplish this, type cs.heinz.cmu.edu in the box beside the words Host Name/Address. - Type your user name in the User ID text box.
- Type your password in the Password text box.
- When a password is typed into the Password text box, for security reasons, asterisks appear rather than the typed letters.
- Left click on the OK button.
- Navigate within andrew.cmu.edu.
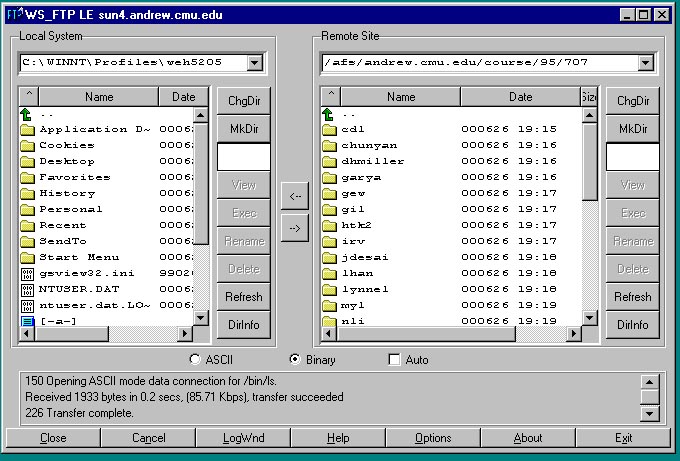
Once the connection is made to unix.andrew.cmu.edu, the ftp window will show contents on the two larger text windows. The larger text window on the left side is the Local System window. It reflects what is stored locally on your computer. Similarly, the larger text window on the right side is the Remote System window. It reflects what is stored on the remote computer, which in this case is unix..andrew.cmu.edu. Below is an example of what the screen may look like at this point (the right window may have additional contents).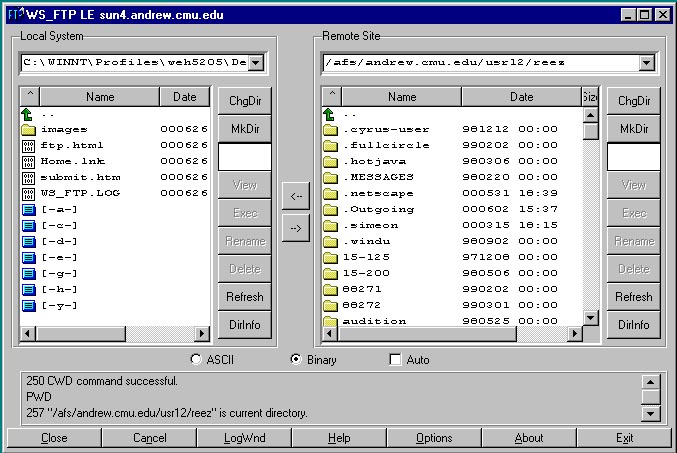
The Remote System side (on the right in the ftp window) displays the files in the current directory (or folder). You will find that you are in the directory of your andrew account after the connection is made.
*The following steps are critical for you to go to the course account.- Click "chgdir" button on the up-right corner of the remote
system window. A dialog window pops up, you should input the full
path of the course account"/asf/andrew/course/95/707" as shown
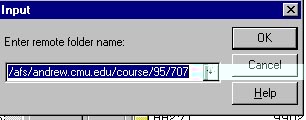
- Click "OK". You will arrive at the course account. Under the course
account, a directory is built for each enrolled student. Your directory
is named after your ID on your E-Mail address you registered on the
class roster. For instance, if your E-Mail address is
abc1@andrew.cmu.edu, the name for your directory is abc1. It is
illustrated as below.
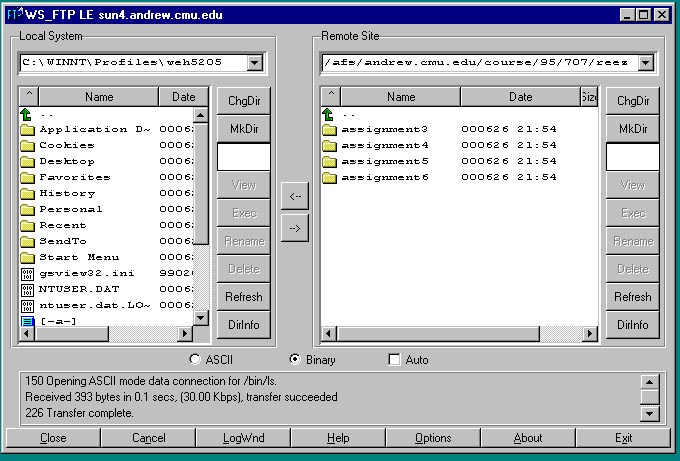
- Click your handle next to your E-Mail ID to enter your directory
- Click "chgdir" button on the up-right corner of the remote
system window. A dialog window pops up, you should input the full
path of the course account"/asf/andrew/course/95/707" as shown
- Transfer your files.
Enter into the folder for an assignment by clicking the handle. You must copy all files that are part of your solution to a problem into that assignment's folder.- You must select ASCII as the format in which you want to transfer your file. There are three options for how to transfer files: ASCII, Binary, and Auto. These options are listed in the FTP window underneath the contents of the Local System and the Remote System. Before you transfer any files, left-click once with your mouse on the white circle beside the word ASCII. The circle beside the word ASCII should have a black dot in it before you transfer any files.
- On the Local System part (left side) of the FTP window, navigate to where you have stored your work. The Remote System part (right side) of the FTP window should be in the directory in which you want your work to be located. Refer to the previous subsection entitled Note on Navigating between Folders, for instructions on how to navigate up and down the directory hierarchy.
- One way to copy a file is to double left click on the file you want
to copy. In this case, the file will automatically be copied to the
other system.
Be Careful! Distinguish between folders and files.
Folders have yellow icons in the shapes of folders beside them. Files, on the other hand, have icons beside them that look like white pages with zeros and ones on them.- Double-clicking on a folder will show you the contents of that folder.
- Double-clicking on a file in the Local System will copy it to the Remote System, and double-clicking on a file in the Remote System will copy it to the Local System.
- Another way to copy files is to use the <-- and
--> buttons as described below.
- Left click on the file you want to copy the remote system; be sure to click just one time to select the file.
- Between the Local and Remote System sides of the FTP window are
two buttons with arrows on them.
- The --> arrow copies files from the Local side to the Remote side.
- The <-- arrow copies files from the Remote side to the Local side.
- Revise your submitted files.
If you like to hand in a revised edition of your work to the course account, your are suggested to put the new file under the same folder with the old one and differentiate it from the old one with a different and meaningful name. For instance, suppose I have submitted my work on assignment3 and put the file--assignment3_reez.java in the folder named assignment3; now I find some bugs in the java file and fix them; to submit the corrected program, I would like to rename the assignment3_reez.java to assignment3_reez1.java and put it in the same folder with assignment3_reez.java.
- Keep a copy of your work on diskette.
The copy of the file you store on the remote system using FTP can function as a backup copy of your work. However, it is still a good idea to keep copies of all of your programs on diskettes. .
Using Unix Shell
If you like to transfer you files on Unix Shell by such commands as cp, mv and so on, the thing is very easy; just keep it in mind that use the full path "/asf/andrew/course/95/707/" as the destination of the copy commands.