Return to lecture notes index
October 11, 2007 (Lecture 10)
Credits
- The portion of today's lecture on the make utility was based on a
tutorial by an unknown author. It was popular on the Web a few
years back and has since been used by various classes including OS
and graphics here.
What is make
"Make" is a utility that helps a software developer build software.
Without some way of organizing a large build, software developers would
be forced to waste time by rebuilding all components -- or to risk
missing a modified component and building an inconsistent update. Make
automates the process ensuring a fast, reliable build. Its configuration
file, the "Makefile", serves roughly the same purpose as a CodeWarrior
or Microsoft Project.
Why make?
Its easy and efficient to build small projects with a compile command.
For example,
cc myapp.c -o myapp.
However, this method becomes very inefficient for large projects such as the
ones you will be building in this class. For example, running
cc foo.c bar.c baz.c -o myapp
when baz.c changes means you are wasting time compiling the other files.
Ideally, you would like to only compile baz.c and then link it with the other
object files. You could do this yourself, but make lets you automate it. The
goal of make is to build your project with the minimum amount of work.
Basic Idea
You supply make with a file (whose default nameis " Makefile") which
describes the dependenciesbetween files in your project and a method for
satisfying each dependency. These dependenciesform a DAG - for example:
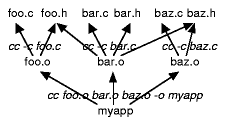
Now, when make is run, for each dependency, if the target file is older than
the file it depends on, it will execute the method to bring the target file
up to date. For example, suppose we change foo.h. Make will recognize that
foo.o and bar.o depend on it and will recompile them. Next, it will relink
myapp.
Simple Makefile
A makefile consists of one or more rules which have the form:
target : source(s)

[TAB]command

[TAB]command
The first character of each command line must be a TAB. The makefile
corresponding to the above graph is
myapp: foo.o bar.o baz.o
       cc foo.o bar.o baz.o -o myapp
foo.o: foo.c foo.h
       cc -c foo.c
bar.o: bar.c bar.h foo.h  baz.h
       cc -c bar.c
baz.o: baz.c baz.h
       cc -c baz.c
Comments Any line beginning with a `#' is ignored by make.
Makedepend
One headache with makefiles is making sure that you have specified dependencies
to header files correctly. Makedepend is a tool that will do this for
you automatically. You run makedepend on all your source files:
makedepend foo.c bar.c baz.c and it will add the correct dependencies to
Makefile. You can use the -MM option of gcc to do the same thing.
By default, makedepend adds the dependencies directly to a file named
"Makefile" or "makefile". The -MM option of gcc/++ outputs the dependency
rule to the console.
Macros
Makefiles can have macro definitions and uses. For example, with
CC    = gcc
CCOPT = -g -DDEBUG -DPRINT
#CCOPT = -O2

foo.o: foo.c foo.h
       $(CC) $(CCOPT) -c foo.c
foo.c will be compiled for debugging or with
optimization depending on which CCOPT isuncommented. Macros definitions can
also be modified when they are used. For example,
OBJECTS = foo.o bar.o baz.o
dep:
      makedepend $(OBJECTS:.o=.c)
will cause makedepend to be called on foo.c, bar.c and baz.c when the dep
target is made.
Suffix Rules
Often, a project has many rules that have common commands applied
to files with the same suffixes. For example, each of the .o files in our
example depend on its parent .c file and is compiled with the same command.
We can replace this with a suffix rule:
.c.o :
       $(CC) $(CCOPT) -c $*.c -o $@
$* is a special macro for the prefix the two files share and
$@ contains the target name.
Default Rules
Make has a lot of built in defaults that are used when a user-defined rule
can't be found. For example, it can infer that foo.o depends on foo.c and
use a generic C compilation rule to update foo.o. In general, AVOID USING THE
DEFAULT RULES.
A Menagerie of Makes
There are many different Makes with widely varying features. Perhaps the
most popular alternate make is GNU Make, which has the advantage of having a
manual freely available. Some makes exploit the parallelism of the dependency
graph to distribute the make across a number of workstations.
A Larger Example
CC    = gcc
#CC   = cc
CPP   = g++
INC   = -ILEDA/incl
LIB   = -LLEDA
CCOPT = -g -DDEBUG -DSPACEMONITOR\
            $(INC) $(LIB)
#CCOPT  = -O2 $(INC) $(LIB)
CPPOPT= $(CCOPT)

GENERALS  = cache.o disthandler.o \
            internals.o dispatcher.o util.o \
            builder.o group.o relation.o \
            errprint.o diffmaprle.o aapair.o \
            aablock.o stdrel_llb.o \
            stdrel_sortseqpair.o

DISPLAY   = display.o
INTERNALS = HPF.o

DISPLIBS  = -lP -lG -lL -lWx -lX11 -lm

all: fung

fung: libdist.a libfxtimers.a fung.o \
  $(DISPLAY)
      $(CPP) $(CPPOPT) fung.o \
      libdist.a libfxtimers.a \
      $(DISPLAY) $(DISPLIBS) -o fung

libdist.a : $(GENERALS) $(INTERNALS)
      ar ruv libdist.a $(GENERALS) \
          $(INTERNALS)

$(DISPLAY): display.C
      $(CPP) $(CPPOPT) -c display.C \
      -o $(DISPLAY)

.c.o :
       $(CC) $(CCOPT) -c $*.c -o $@

dep:
       makedepend $(INC) \
       $(GENERALS:.o=.c) \
       $(INTERNALS:.o=.c) \
       $(DISPLAY:.o=.C)
The Concurrent Versioning System (CVS)
CVS is a very important to for managing multiple versions of software.
In production software it can be used, for example, to enable developers
to concurrently develop a new major release and maintain an old one.
And, as in industry, its ability to manage versions is very important
during development -- both by yourself, and especially with others.
By maintaining multiple versions, it enables you to see changes, roll
back to prior version, and, more generally, see how you got from point-A
to point-B -- a picture whcih gets increasingly hazy as more people
become involved.
It is compelling to use CVS for significant class projects, because it
prevents those moments of tremendous realization -- that something working
was irrepairably overwritten by something that was not. And, it provides
a mechanism for determining an answer to the question, what did my partner
do last night?
Initializing a CVS Repository
The CVS repository is separate form the working directory. This repository
is based on RCS, the Revision Control System. Regardless, the CVS repository
needs to be created before you can use CVS.
This is done by running the command cvs init. But, before running
cvs init, you should set the environment variable CVSROOT
to the full name of that directory. Here's a quick example:
  mkdir ~/15-395
  setenv CVSROOT ~/15-395/cvsroot
  cvs init
As an alternative to setting CVSROOT, you can use the -d option -- but
this is a pain, becuase you'll need to use it for every command. It really
should only be used to access alternative, not primary, repositories.
  mkdir ~/15-395
  cvs init -d ~/15-395/cvsroot
Importing an Existing Project
Eventually, you'll need to get your files into CVS. When creating files
or directories one at a time, we'll do this with add (they can be
removed with, you guessed it, remove).
But, at this point, many of you may have already started with your shell
assignment. So, we can import the assignment all at once. This
will create the project and add all of the files.
When importing files, CVS gives you the opportunity to enter a message
describing the import. This message becomes part of the log. This
message can be prescribed using the -m "Message option. If it
isn't provided as an option, CVS will place you into your default editor
enabling you to type the message there.
When importing, you must provide the name of the project. This is because
you might maintain several projects wihtin the same CVS repository. For
example, you mgiht have one repository that encompasses all of your
courses, or at least all fo your projects in 15-395.
You also need to provide names for the current vendortag and
releasetag. The vendortag is basically the name for the
major version. The releasetag is basically the name for the
minor changes. These names are in addition to the actual version
number that CVS will assign.
Below we move into the pre-existing working directory for a project
and then we import the project. It is critical to be in the correct
directory before importing. Then, we remove the old directory -- or,
as I prefer, throw it into a backup area. Once the files are in CVS,
we should access it through a copy managed by CVS.
  cd hello
  cvs import -m "Hello World" hello example start
  cd ..
  mv hello backups
Getting to Work
Once a project is imported into CVS, you should check it out before
beginning work. This will let CVS (and possibly other developers)
know that you are potentially modifying files.
Projects are checked out using the checkout command. This
will log the version of the files that we have as well as extract
them for us to work on -- including subdirectories, &c.
  cd ~
  cvs checkout hello
  cd hello
  ls
At this point we are free to modify files, as well as add and delete
files and directories. The add command works for both. The files need to be
created/deleted form the working directory before performing the add or
remove from cvs. If we add or delete files or directories, we need to tell
CVS using the add and remove commands as
follows:
  cvs add hello.h
  cvs add foo.h
  cvs remove foo.h
Publishing Changes
The changes you make remain in your working directory until
you commit them to the repository. This is very, very easy:
  cd ~
  cvs commit -m "A message describing the changes" hello.c
  cvs commit -m "A message describing the changes" hello.h
What if My Partner Changed Things And I Need An Update
CVS can actually merge many changes together. If the changes aren't
near each other in the code and seem independent -- it will do it like
magic. If not, it will show you the conflict so you can decide how
to fix it.
So, if you think your partner made changes to a file, just use
update. Either nothign will happen, you'll be brought up-to-date,
or it'll show you the changes so you can merge them by hand.
cvs update hello.c
Diffs
If you would like to see the differences between what you have in your
working directory and the most recent version in the repository --
where you started or a more recent update, you can do this with
diff
cvs diff hello.c
Status
To obtain a report about a file, you can use either status
or history. Status reports the version number and message
associated with the current version. History reports the history
of the version -- each cvs command, messages, &c.
  cvs status hello.c
  cvs history hello.c
Ooopsie! I Need an Old Version
Let's say that a bug has appeared out of nowhere. Or, maybe you've
been thrashing whle adding a new feature -- and want to go back to
an older version and try again. How do you get those old copies out
of CVS?
This is my favorite feature: The "-D" flag. It performes the requested
action upon the version most recent as of the provided date. The
date can be provided in any common format, such as:
- 1972-09-24 20:05
- 24 Sep 1972 20:05
When used with th checkout feature, it will checkout to you
the version current as of the date you specified. The same is true of the
export feature.
  cd ~
  cvs checkout hello -D "24  Sep  1972  20:05"
  cd hello
  ls
Branching
Sometimes it makes sense to branch a development tree. This often happens
in industry when a new major software release occurs. Development
continues to move forward with the latest and greatest version. But, the
older version will still be maintained in the sense that major bugs or
security issues will be repaired. CVS is capable of breaking away a
branch from the otherwise main stream of development to support this.
Branching a project invovles a few steps:
- Tag the project to give the main trunk (not the branch) a new name
- Take the existing working (not committed) copy and create a
branch from it.
  cvs tag hello_root
  cvs tag -b -r hello_maintanence_branch
Merging branches
Let's say that you were fighting a killer bug as you approached the big
release date. To save yourself, you decide to delay this feature until
the next release. So, you want to concurrently finish off the release
version while chipping away at that bug as time allows.
This can be accomplished by checking out the project, commenting out
the feature, checking it back in, and branching. Once this happens,
Once this happens, the main trunk can be developed for release. And,
at the same time, the branch can be checked out and the bug can be wrestled
therein. There is no fear of damaging the release by chipping away at the
bug.
But, once the bug is fixed, it will be desirable to merge the changes
back into the release version -- whether this happens before or after
the actual release.
CVS accomplishes this using the merge feature. The process we want to
follow is this:
- Tag the current "pre-merge" version in the repository with an
appropriate name (tag command)
- Merge the changes into the working copy (update -j)
- Apply an appropriate revision tag to the files in the working
directory (rtag command)
- Apply a new tag to the version in the repository (tag command)
- Commit the merged version in the working directory into
the repository
  cvs tag hello_released_without_favorite_feature
  cvs update -j hello_with_favorite_feature hello.c
  cvs tag hello_release_version_plus_favorite_feature
  cvs commit -m "Merged in good version of problematic feature!"