Return to the lecture notes index
Lecture #8 (May 27, 2004)
Queues
Consider queues in the real world. They can be found everywhere. We wait
in a queue at the checkout in a supermarket. We wait in a queue to buy o
tickets for a movie. When we arrive somewhere and a queue exists, we have to
join the queue at the end (it is considered impolite to "cut" in front of
people who are already in the queue). As people are processed, we move
closer to the front of the queue, and we wait in the queue until we have
moved all the way to the front, and then we are processed. We enter the
queue at one end, and exit the queue on the other end.
Real-world queues can be easily modeled as a data structure.
A queue is a first-in-first-out structure where we process
the items in the same order in which we added them. The operations on a queue
are:
- enqueue - adds an item to the end of the queue
- dequeue - removes the item from the front of the queue
- peek - tells us what is on the top of the queue
without actually removing it (this operation is not always included)
Why Use Queues?
Queues don't have many operations defined upon them. It may seem
like they are significantly less powerful than a vector or a linked-list.
We can add to either end of a vector or a linked-list, and we can perform many
other tasks with them as well. So why would we want to use a queue?
We use queues for the same reasons that we use them in the real world.
Sometimes, fewer operations impose more of an order, and therefore make
things run more efficiently. Imagine the checkout at a grocery store if
there was more than the basic queue operations. Suppose cashiers could
choose at random which customer they will process next, or suppose that
customers could jump into the line at any random spot they choose. The
result would be chaos and the efficiency would be lost.
This need for order is sometimes necessary in the computer world as well.
When you print something in a cluster, the print job enters a queue, so the
amount of time you have to wait for your printout is only dependent on the
jobs that are in the queue in front of you. Suppose that you are trying to
meet a deadline, and every now and then some other print job enters the
queue ahead of you -- there would be no way to know how long it will take
before your print request is processed.
Implementing Queues With Linked Lists
Now that we know what queues are, how do we go about building them?
Well, we have already mentioned that vectors and linked-lists have all of the
capabilities of queues, so it seems natural to build on top of them.
Building a queue using a linked list is quite trivial. enqueue() is
implemented by adding to the tail of the list and dequeue() is
implemented by removing from the head of the list. It is especially
important to add to the tail and delete from the head, as opposed to adding
to the head and deleting from the tail, on singly linked lists. To understand
this, think carefully about the expense of deleting from the tail. With, or
without, a tail reference -- it involves walking through the list to find
the node prior to the tail. Deleting from the head is, however, quite
inexpensive, since the head reference is always the predecessor of the head
node. And, of course, adding to the tail of a sinly linked list, especially
with a tail reference, is quite inexpensive -- only the tail node and the
tail reference, itself, need to be updated in the common case.
Implementing Queues With Vectors
Let's see how they would be built using a vector.
To model a queue with a vector, we need to add at one end of the vector and
remove from the other. Since both adding and removing at index 0 are expensive
operations in a vector, this model will be inefficent, regardless of which side
of the vector we choose to be the front of the queue and which side we choose
to be the end.
Suppose we impose one more restriction on our queue. Suppose that we limit the
number of items that can be in the queue at any one time. If we do this, we
can use the vector as a circular buffer.
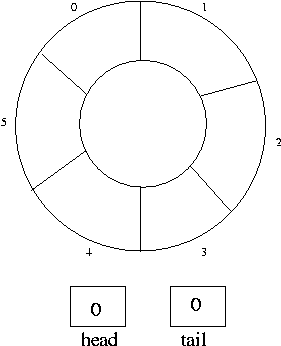
To implement the fixed-size queue in a vector, we still need to implement the
"enqueue" and "dequeue" operations. To do this, we define a "head" and "tail"
index. When we insert an item into the queue, we increment the tail index
and then insert it at tail index. When we remove an item from the queue, we
remove it from the head index, and then increment the head index. If the head
or tail index becomes higher than the number of items in the vector, we reset
it to 0.
In order to make this work, all we have to do is make sure that the tail index
never steps on the head index, because that would mean that we have overwritten
one of the values in the queue. Otherwise, we can enqueue and dequeue as we
please, and the head and tail indexes will circle through the vector and
maintain the first-in-first-out behavior.
Let's take a look at how we could do this.
Implementing A Queue With A Vector
Implementing a queue with a vector
requires us to impose a maximum number of elements that the queue can
hold, and then using the vector as a circular buffer. Why do we need to
do this? A queue requires us to add new items at one end and remove items
from the other end, but either adding at or removing from the beginning of
the vector causes all of the other elements in the vector to shift up or
down. This is too time consuming, so we instead create a fixed-size
vector and keep track of our current head and tail indexes. When we get
to the end of the vector, we reset to 0 and keep going. In effect,
this makes the linear Vector into a circular one -- 0 comes after the
last element.
The following class implements a queue using a Vector.
import java.util.*;


/* This class implements a queue using a Vector.  It has the standard queue
 * operations enEqueue and deQueue, as well as a peek method to see the first
 * item without removing it, and an isEmpty method to check if there is
 * anything currently in the queue.
 *
 * Since we are implementing a queue, we have to fix the size of the Vector
 * that we are using.  This size is determined as a parameter to the
 * constructor.  The head and tail of the queue are managed by the headIndex
 * and tailIndex instance variables
 */
class VectorQueue
{
   private Vector queue;   // stores the items in the queue
   private int headIndex;  // the index of the first item to remove
   private int tailIndex;  // the index where we can add the next item


   /*
    * The constructor for the VectorQueue class.  It takes in the
    * number of items that the queue can hold as a parameter
    */
   public VectorQueue(int size)
   {
      // initialize the vector and set it to the specified size
      queue = new Vector(size);
      queue.setSize(size);

      // start both the head and tail at the first spot in the vector
      headIndex = 0;
      tailIndex = 0;
   }


   /*
    * This method adds a new item to the queue at the tail
    */
   public void enQueue(Object addObj)
   {
      /*
       * check that the queue is not full.
       *
       * if the head and tail are the same, then either the queue is
       * empty or the queue is full.  if the queue is full, then the
       * index where the tail is will already have something in it
       */
      if ((headIndex == tailIndex) && (null != queue.elementAt(tailIndex)))
      {
         // throwing an Exception would probably be better, but we'll
         // keep it simple

         return;
      }


      /*
       * change the element at the tail index in the vector to reference
       * the new item.
       *
       * we have to use setElementAt() and not one of the add() or insert()
       * methods because we don't want to change the size of the vector
       */
      queue.setElementAt(addObj, tailIndex);

      // increment the tail index, or reset it to 0 if we reach the end
      tailIndex = (tailIndex + 1) % queue.size();
   }


   /*
    * This method removes the item at the head of the queue
    */
   public Object deQueue()
   {
      // create a new reference to the item we want to dequeue
      Object dequeueObj = queue.elementAt(headIndex);

      // if the reference is null, then the queue was empty
      if (dequeueObj == null)
      {
         return null;
      }

      /*
       * remove the item from the vector by setting the head index to null
       *
       * we have to use setElementAt() because removeElementAt() shifts
       * the items after the head, which we don't want
       */
      queue.setElementAt(null, headIndex);

      // increment the head index, or reset it to 0 if we reach the end
      headIndex = (headIndex + 1) % queue.size();

      // return the object that we remove from the queue
      return dequeueObj;
   }


   /*
    * This method returns the object at the head of the queue, but does
    * not remove it
    */
   public Object peek()
   {
      // return the object that is currently at the head index
      return queue.elementAt(headIndex);
   }


   /*
    * This method tests whether or not the queue is currently empty
    *
    * if there is nothing at the head index, then there is nothing in
    * the queue
    */
   public boolean isEmpty()
   {
      // return true if the queue is empty, false otherwise
      return (null == queue.elementAt(headIndex));
   }
}
Stacks
In the real world, a stack is a way of organizing something where all of the
items are piled on top of one another. We might have a stack of papers on a
desk, a stack of books, etc. The easiest way to work with the items that are
in the stack is to take off the one on the top and process it. The easiest way
to add something to the stack is to put it on the top of the pile.
In computer science, we can implement a stack in a similar way.
A stack is a first-in-last-out data structure
where we always remove the item which has most recently been added to the
stack. This means that in order to remove the first item that we added we
first have to remove everything else, which is why we say that it is a
first-in-last-out structure.
Let's look at the operations on a stack:
- push - adds an item to the top of the stack
- pop - removes the item from the top of the stack
- peek - tells us what is on the top of the stack
without actually removing it (this operation is not always included)
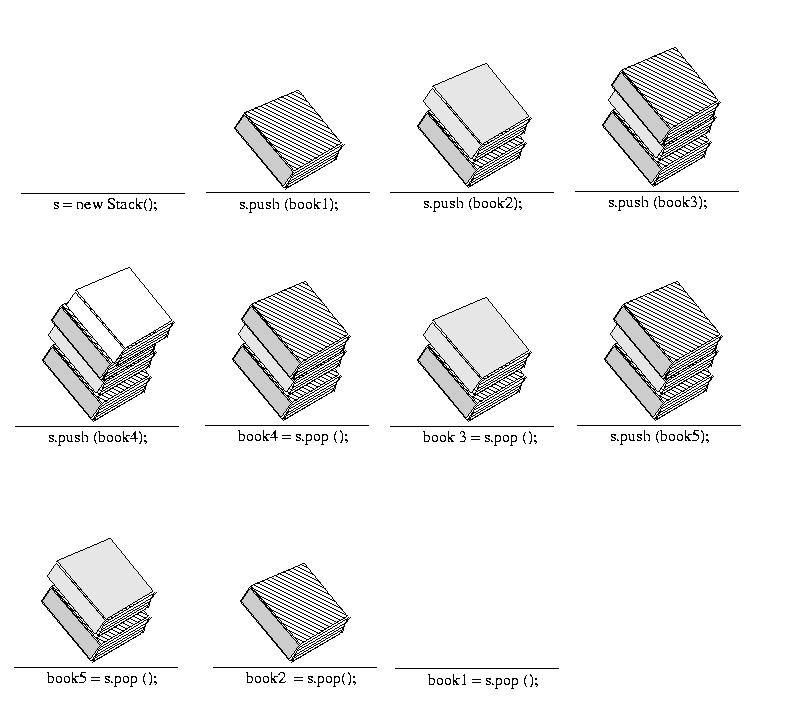
Consider the example of a "book stack" shown below:
Why Use Stacks?
Much as was the case for queues, stacks are far less powerful than
linked lists or vectors. We don't use them because we want more
power -- we use them because we want more disciple. We'll talk
about many examples of their use, beginning next class.
But for now, let me mention some things that might, or might not,
be familiar to you. If not, don't fret -- we'll get there.
Sometimes we use stacks to store the intermediate steps in a
calculation. Consider, for example, RPN calculators, like the famous
HP scientific calculators.
Or, if you remember discussing the "call chain", a.k.a, the "call
stack" in your intor class, you might now realize that we
can model the calling and returning of methods using stacks. Each
time we call a method, we push() it onto the stack. And, each
time a method returns, we can pop() if off of the stack.
Then, at any time, this stack will model the state of execution of
our system.
Or, perhaps most familiar at all is the "undo stack" used by popular
software to allow you to undo actions. Each time you make a change,
it pushes it onto the stack. That way, you can choose to "undo", which
will pop the stack to figure out what you did and then undo it. By using
a stack, instead of a random-access or sequentially accessed collection
of changes, we ensure that the user is offered a choice of prior versions
of the document, in an understandable one-at-a-time way. Without this,
the "undo" option would really degenerate into an unorganized menu of the
opposites of popular options, right? Think about it -- here are the opposites
of a bunch of things you did recently, would you care to select one? That
would be an odd feature, indeed!
Implementing Stacks With Vectors
So we need to implement the super-complex behaviors -- "push" and "pop"
(we'll ignore "peek" for now, it is dwarfed by comparison). This requires
us to add and remove items from the same end of the vector. Although
index 0 of the vector might seem like the closest match to the "top"
of a stack, we are going to use the other end. We'll see why in a minute.
To add something to the stack, then, we want to add our new item after the
last item we put in. The add() or addElement() method of the Vector class
does this by default. To remove something from the stack, we will have to
remove the rightmost value, but since there is nothing after it we do not
have to make any other adjustments to the vector.
How is this better than using index 0 as the "top" of the stack. To insert a
new item at index 0, we first need to shift every other item in the vector
up by 1 (what was in index 0 will now be in index 1, and so on), so if the
vector is large this is quite costly. Similarly, if we remove something
from index 0, we need to fill in that spot, so every item in the vector will
have to shift down by 1 index. To do this every time we push or pop is
wasteful, since adding and removing on the righthand side do not require
us to change the vector in any other way.
Implementing A Stack With A Linked-List
Before we can implement a stack with a linked-list, we need to decide
which end of the list we want to use as the top of the stack. Do we want
to add and remove elements from the head, or do we want to add and remove
elements from the tail?
Adding to the head only requires us to rearrange a few references in order
to include the new node in the list, as does adding to the tail. Removing
from the head only requires us to rearrange a few references in order to
remove the first node from the list. Removing from the tail is a little
more complicated because we have to set the second-to-last element to be
the new tail. Since we cannot go backwards in a singly-linked list, we
have to start at the beginning of the list and traverse until we reach
the second-to-last node. In a long list, this is time consuming, so we
will use the head of the list as the top of the stack.
The following code implements a stack using a linked-list:
/*
 * This class implements a stack using a linked-list.  It has the standard
 * stack behaviors push and pop, as well as a peek method to see the item
 * on the top of the stack without removing it, and an isEmpty method to
 * see test if the stack is empty.
 */
class ListStack
{
   private LinkedList stack;  // stores the items of the stack


   /*
    * Constructor.  It initializes a new LinkedList to be used for the stack
    */
   public ListStack()
   {
      stack = new LinkedList();
   }


   /*
    * This method adds a new item to the top of the stack
    */
   public void push(Object addObj)
   {
      // we are using the head of the linked-list as the top of the
      // stack, so we add to the head
      stack.addHead(addObj);
   }


   /*
    * This method remove the item from the top of the stack
    */
   public Object pop()
   {
      // we are using the head of the linked-list as the top of the
      // stack, so we remove from the head
      return stack.removeHead();
   }


   /*
    * This method returns the item at the top of the stack without
    * removing it
    */
   public Object peek()
   {
      // set the index of the linked-list to be at the head
      stack.resetIndex();

      // return back the item stored at the head
      return stack.getIndexedNode();
   }


   /*
    * This method tests whether or not the stack is currently empty
    *
    * if there is nothing at the head, then there is nothing in
    * the stack
    */
   public boolean isEmpty()
   {
      // set the index of the linked-list to be at the head
      stack.resetIndex();

      // return true if the head of the list is null, false otherwise
      return (null == stack.getIndexedNode());
   }
}